Datasets#
After successfully establishing the data connector, the subsequent step involves loading the data into ConverSight. This process is essentially the creation of the Dataset, where the information from the connected source is imported and organized within ConverSight for further analysis and utilization.
Accessing Datasets#
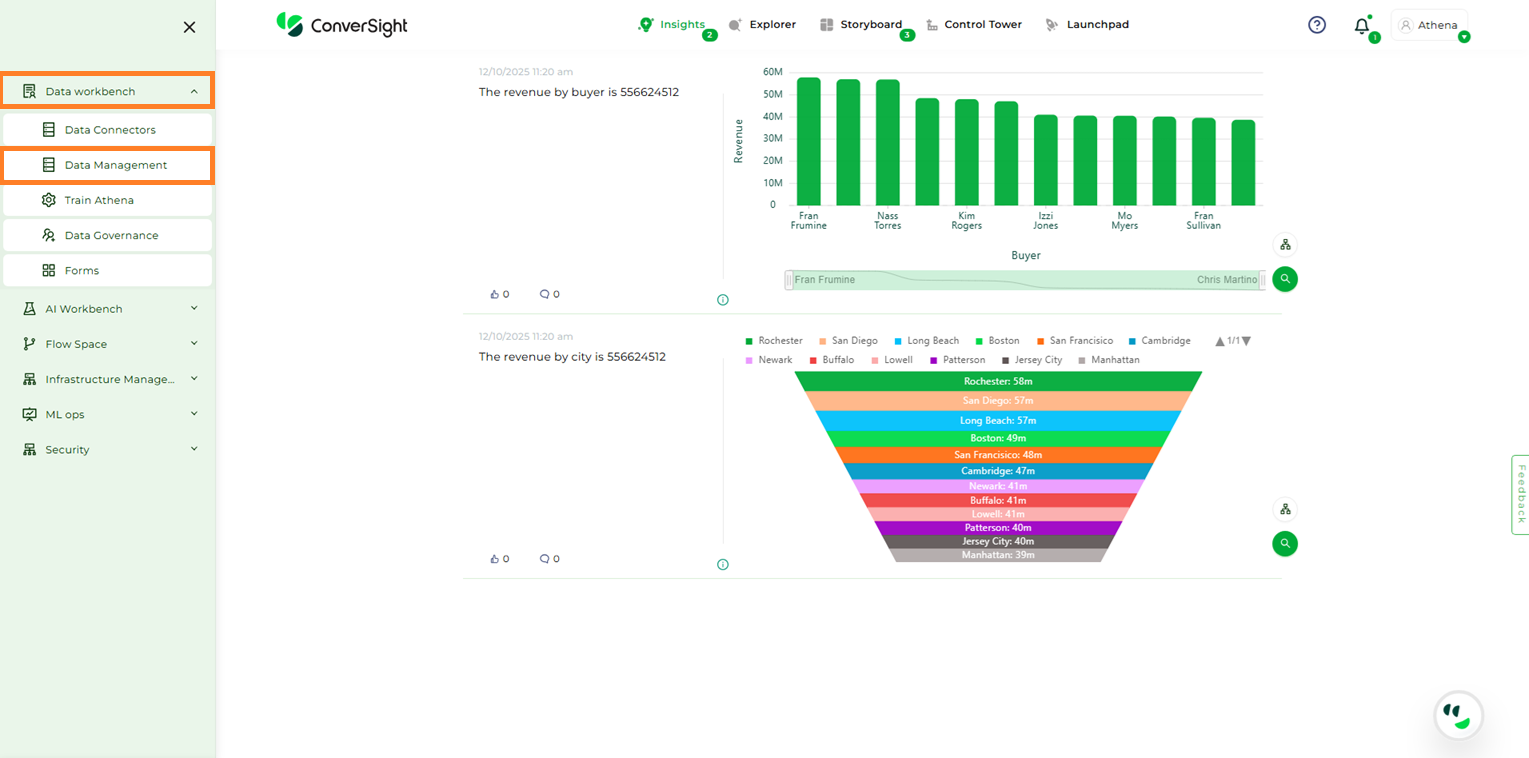
Datasets can be accessed and created by navigating to the Configuration panel and selecting Data Management from the Data Workbench menu. This section provides the necessary tools to create, manage, modify, and use datasets efficiently within the ConverSight platform.
Data Management Page#
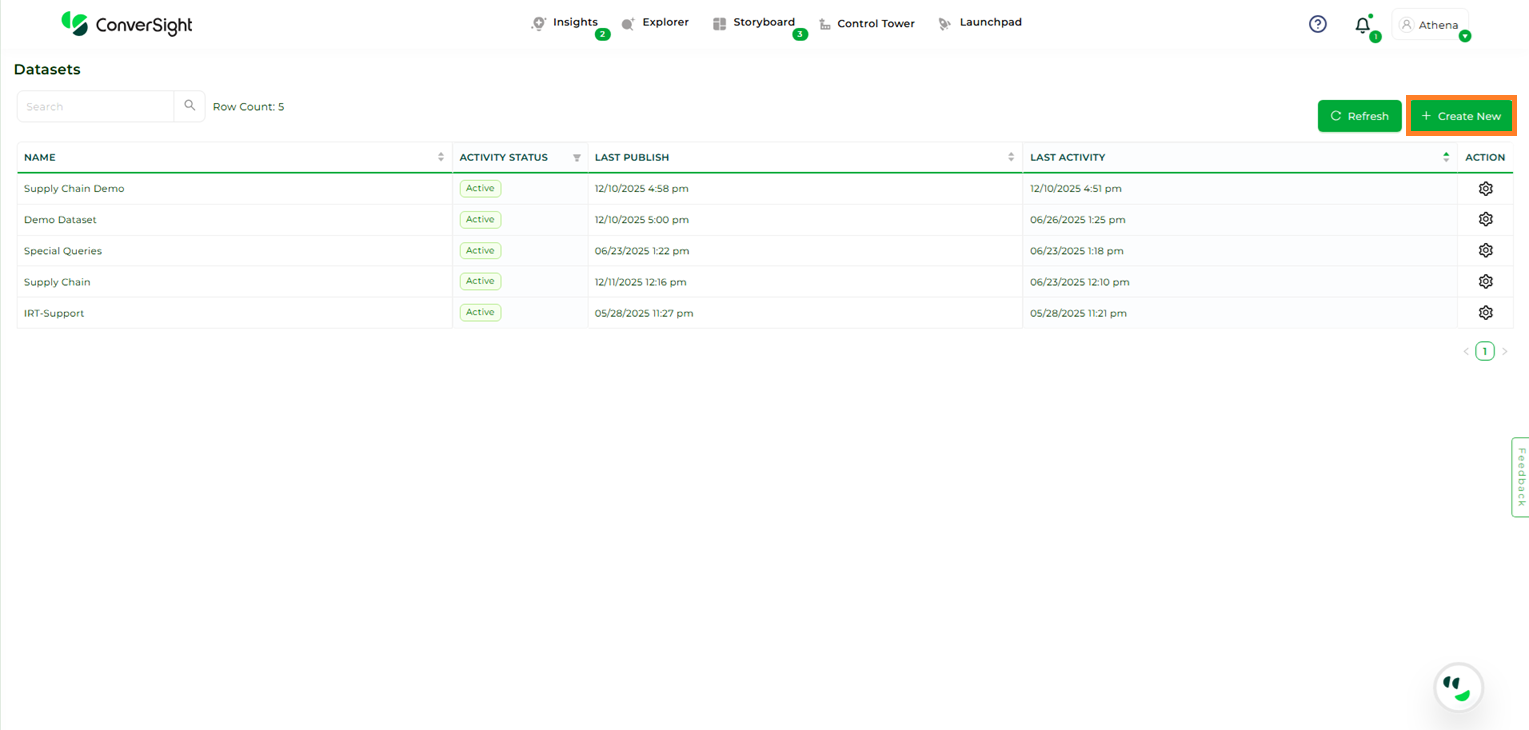
Click on the Create New option to commence the dataset processing in Conversight.
Create New#
Dataset Details#
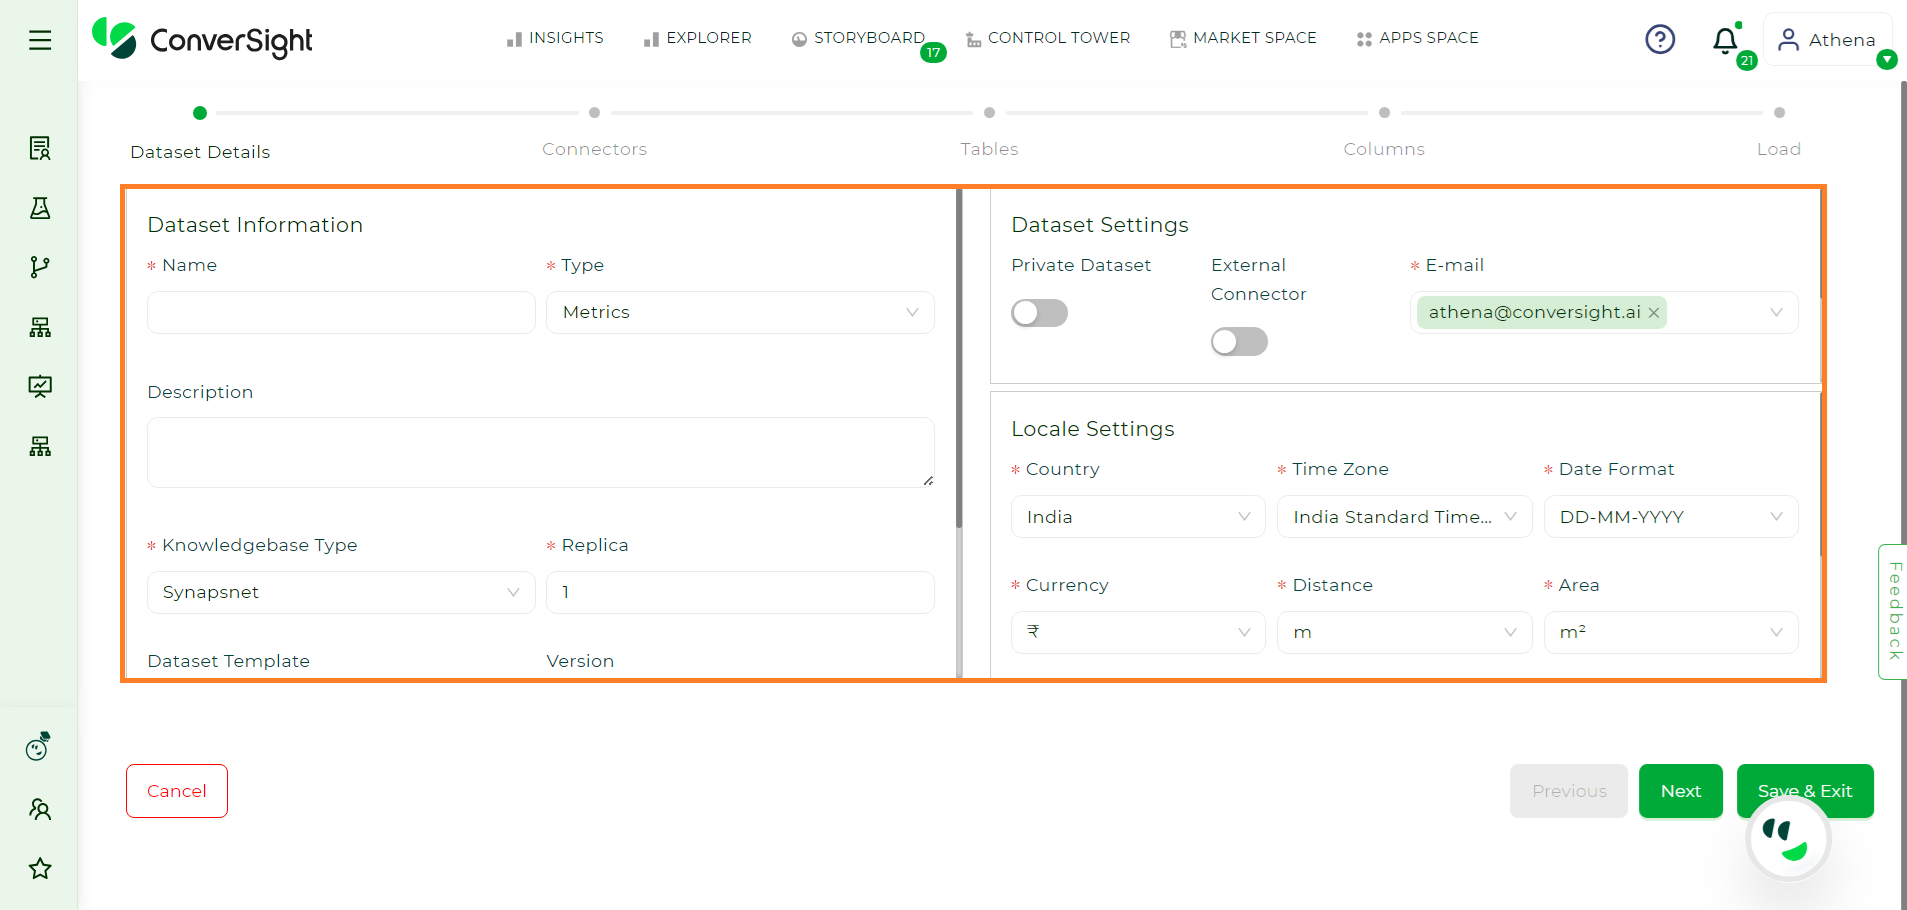
The Dataset Details encompass information about the dataset, locale settings and additional configurations that need to be filled in for dataset configuration.
Dataset Details#
Dataset Information#
The following are the details included in the dataset information:
Dataset Information#
Attribute |
Description |
|---|---|
Name |
Provide a name to your dataset. |
Type |
You must define the type of your dataset by categorizing it based on its inherent characteristics, such as metrics or documents. This is important for organizing the dataset to align with its properties, facilitating effective analysis and utilization in later stages of data processing. |
Description |
Provide a description according to your preference or for enhanced comprehension. |
Knowledgebase Type |
Knowledge base enables you to choose an engine for your dataset. SynapsNet is an enhanced version designed to improve the natural language understanding of your data. Choosing SynapsNet is preferable over KBNet. |
Replica |
A replica is employed to maintain duplicates of your data. You can choose any number of replicas and it’s advisable to generate at least two replicas, particularly for critical datasets. Note: By default, we will furnish you with a single replica of your dataset. |
Dataset Template |
When selecting a dataset template, it’s essential to choose one that matches your dataset. Templates offer a predefined structure, advantageous for maintaining consistency, especially when working with specific applications or tools. Using a template ensures that your dataset adheres to a standardized layout, making it easier to work with and compatible with various systems or analyses. |
Version |
Selecting a dataset template prompts you to choose a version, ensuring data integrity. Align with the appropriate version of your selected dataset template to enhance compatibility with applications, maintaining the dataset’s desired structure and minimizing potential issues during analysis or use. |
Domain |
Specify the dataset’s domain by identifying its primary category, such as industry, subject matter or a specific use case. This provides contextual information about the dataset’s purpose, aiding in its effective utilization for targeted analyses or applications within that particular domain, such as healthcare, finance or marketing. |
Locale Settings#
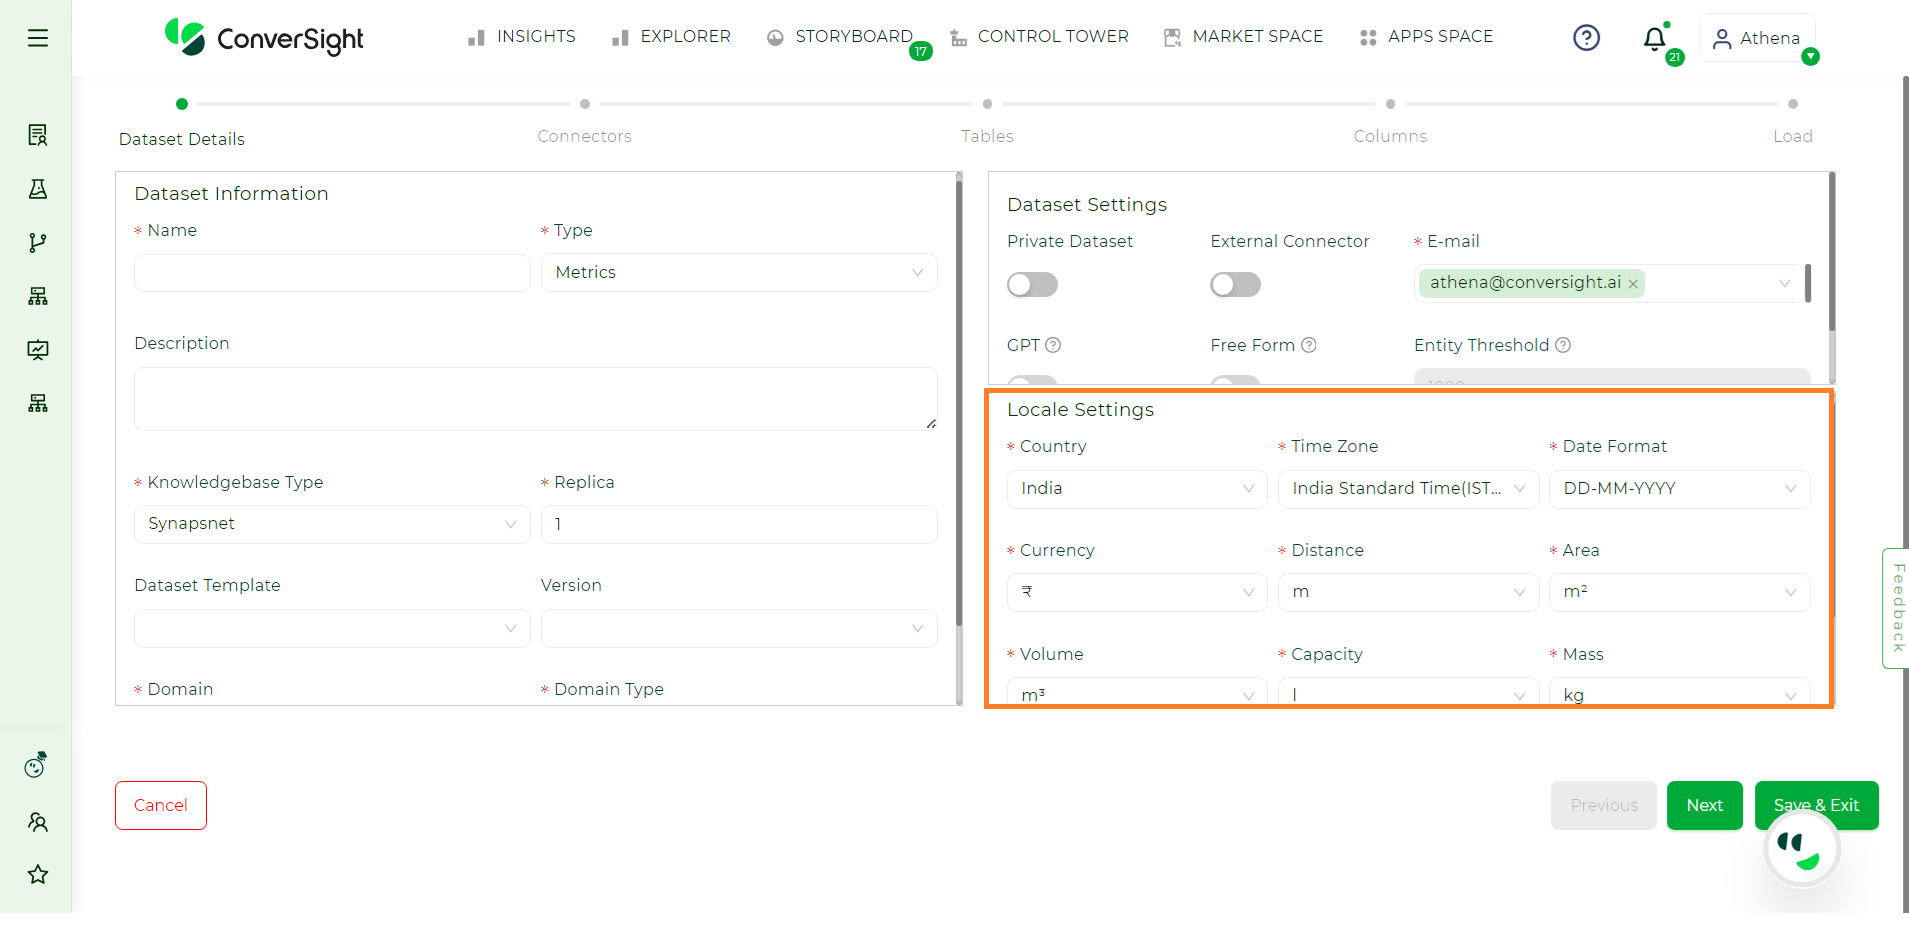
Locale Settings#
Locale settings are customizable configurations tailored to your specific location. Once you choose your locale, the metric options, including currency, volume and distance, will adapt according to the selected locale.
The ISO format checkbox is selected when the data is loaded in one geographical time zone and the insights derived from it are utilized across various geographical locations. This consideration is important because there may be a time lag in data calculations, which might end in a one-day difference and to avoid such, we can check on ISO Format.
Dataset Settings#
The Dataset settings include the following:
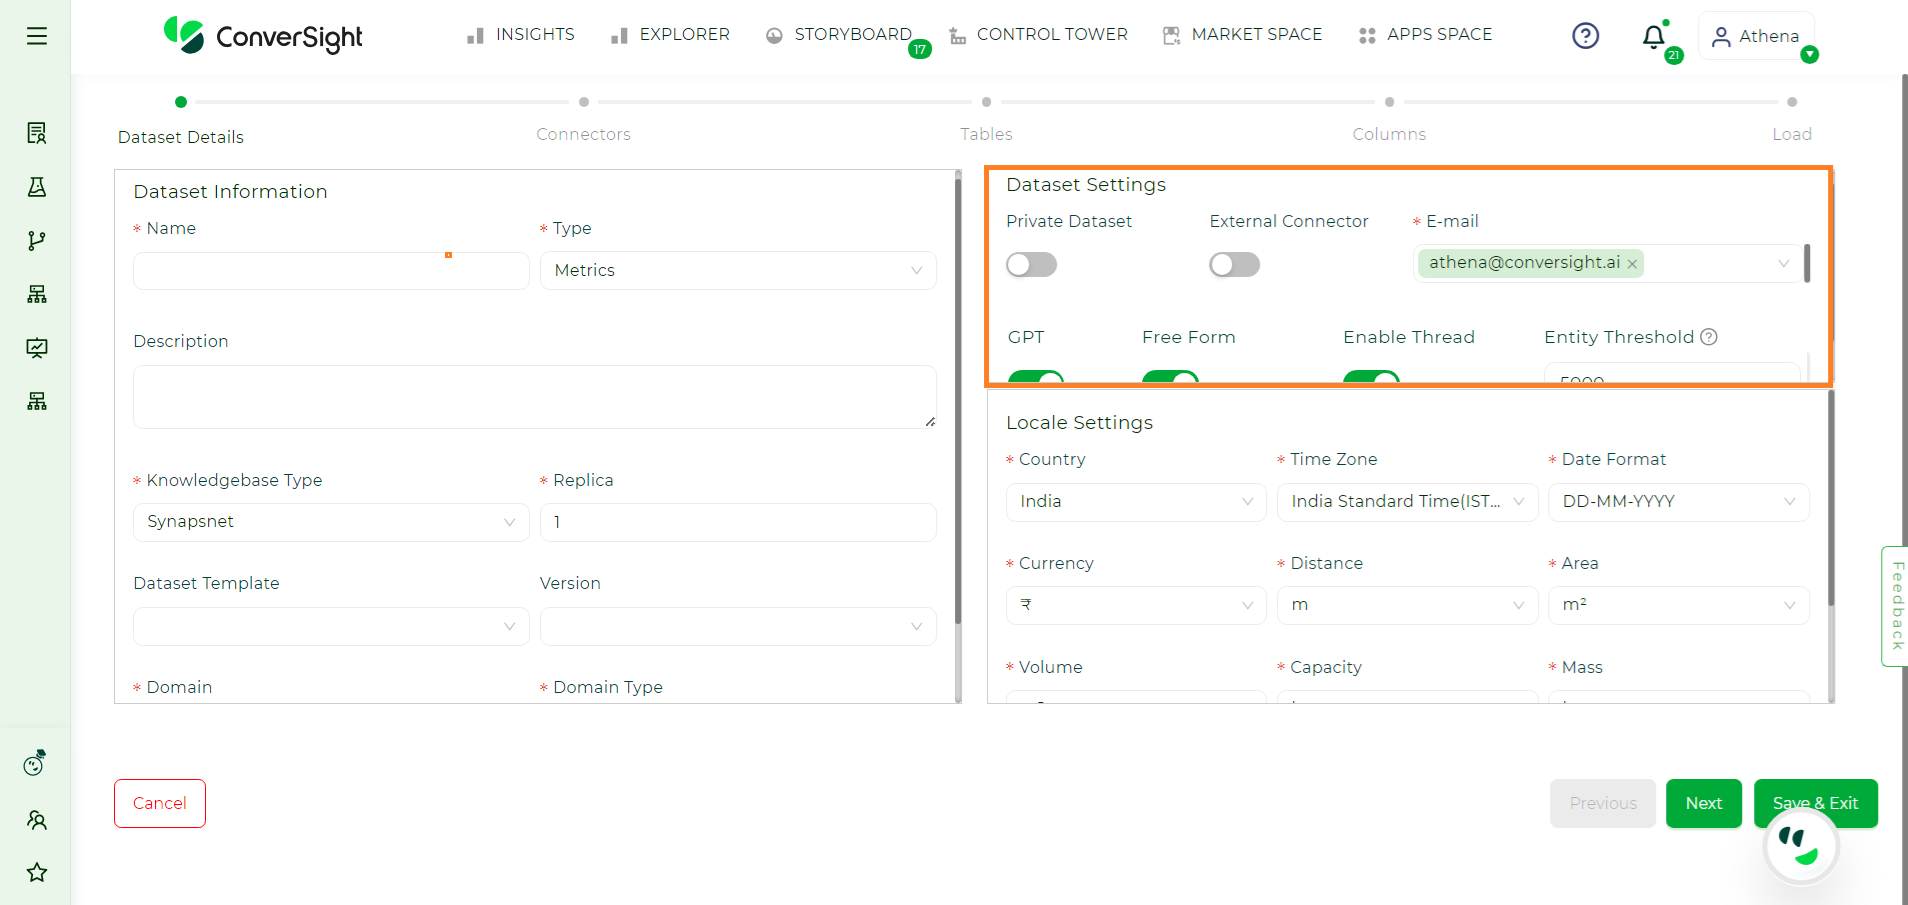
Addtional Settings#
Private Dataset#
Enabling the Private Dataset toggle option ensures the security of your dataset, granting exclusive access restricted solely to you.
External Connector#
Enabling the External Connector toggle option allows you to connect to your dataset where data retrieval occurs directly from the source database through metadata. Enabling the external connector serves to sustain privacy by directly from the source database every time a query is asked to Athena.
NOTE
Currently, the external connector is exclusively accessible for Snowflake.
Email#
The email includes your email address. You may also include alternative email addresses, if necessary, you can also append additional email addresses.
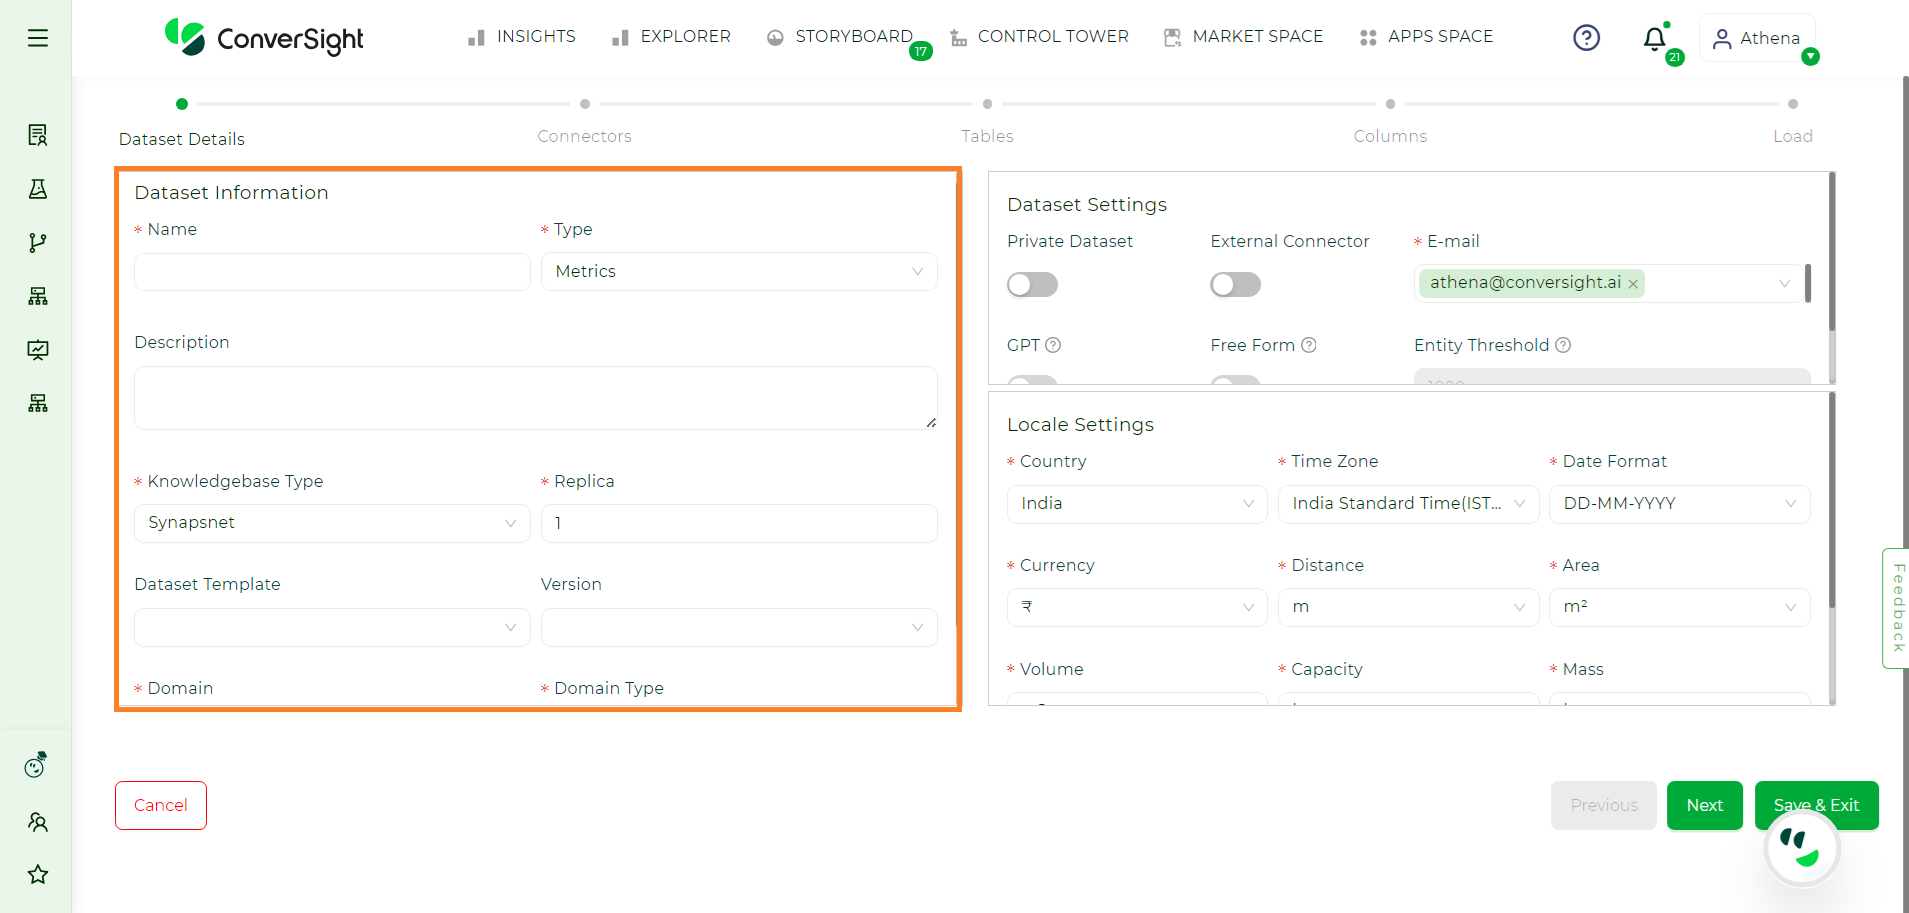
GPT#
Enabling the GPT Mode toggle activates the GPT (Generative Pre-trained Transformer) flow, using the OpenAI model to process natural language queries. When toggled on, this feature allows the system to understand and respond to user queries in a conversational format, leveraging GPT’s advanced natural language processing for data analysis.
Free Flow#
Toggling Free Form enables querying through the SQL LLM (Language Learning Model). This provides a flexible approach to handling SQL-based queries dynamically, allowing for more complex data retrieval directly from the dataset.
If both GPT Mode and Free Form are enabled, the system follows the below multi-step process to handle queries:
First, it tries to resolve the query through Athena
If Athena cannot process the query, it is then passed to GPT Mode, where the GPT model attempts to answer using natural language understanding.
If GPT also cannot resolve the query, it is finally sent to Free Form, where SQL LLM processes the query for a dynamic and complex solution.
NOTE
All column names in Free-Form queries automatically convert to lowercase, with unnecessary prefixes removed for smoother querying and fewer errors.
Enable Thread#
By enabling the Enable Thread toggle option to a specific dataset, users can engage in contextual conversations with Athena. This feature allows questions to build upon the responses of previous queries, maintaining context and ensuring a structured flow of dialogue. It facilitates a seamless interaction where users can refine their queries and explore related topics efficiently.
NOTE
Only the Organization Admin can turn these settings on or off for the organization level. Once the settings are turned on, the Dataset Admin can adjust them for specific datasets.
For a more detailed explanation, Click Here.
Entity Threshold#
Enabling the Entity Threshold toggle allows you to set a limit on the number of entities that can be vectorized in each column. Vectorization converts data into a numerical format for machine learning models. This toggle ensures optimal performance by restricting how many entities are included in each column’s vectorization process.
Once you have completed entering all the necessary details, proceed by clicking the Next button.
NOTE
Loading data through the notebook in ConverSight is limited to Excel/CSV files and is elaborated in Data Loading through Notebook.
Connectors#
Users have the option to select from available data connectors or create a new one by clicking on Create New Connector button. After choosing a data connector, the user can proceed by clicking on Next.
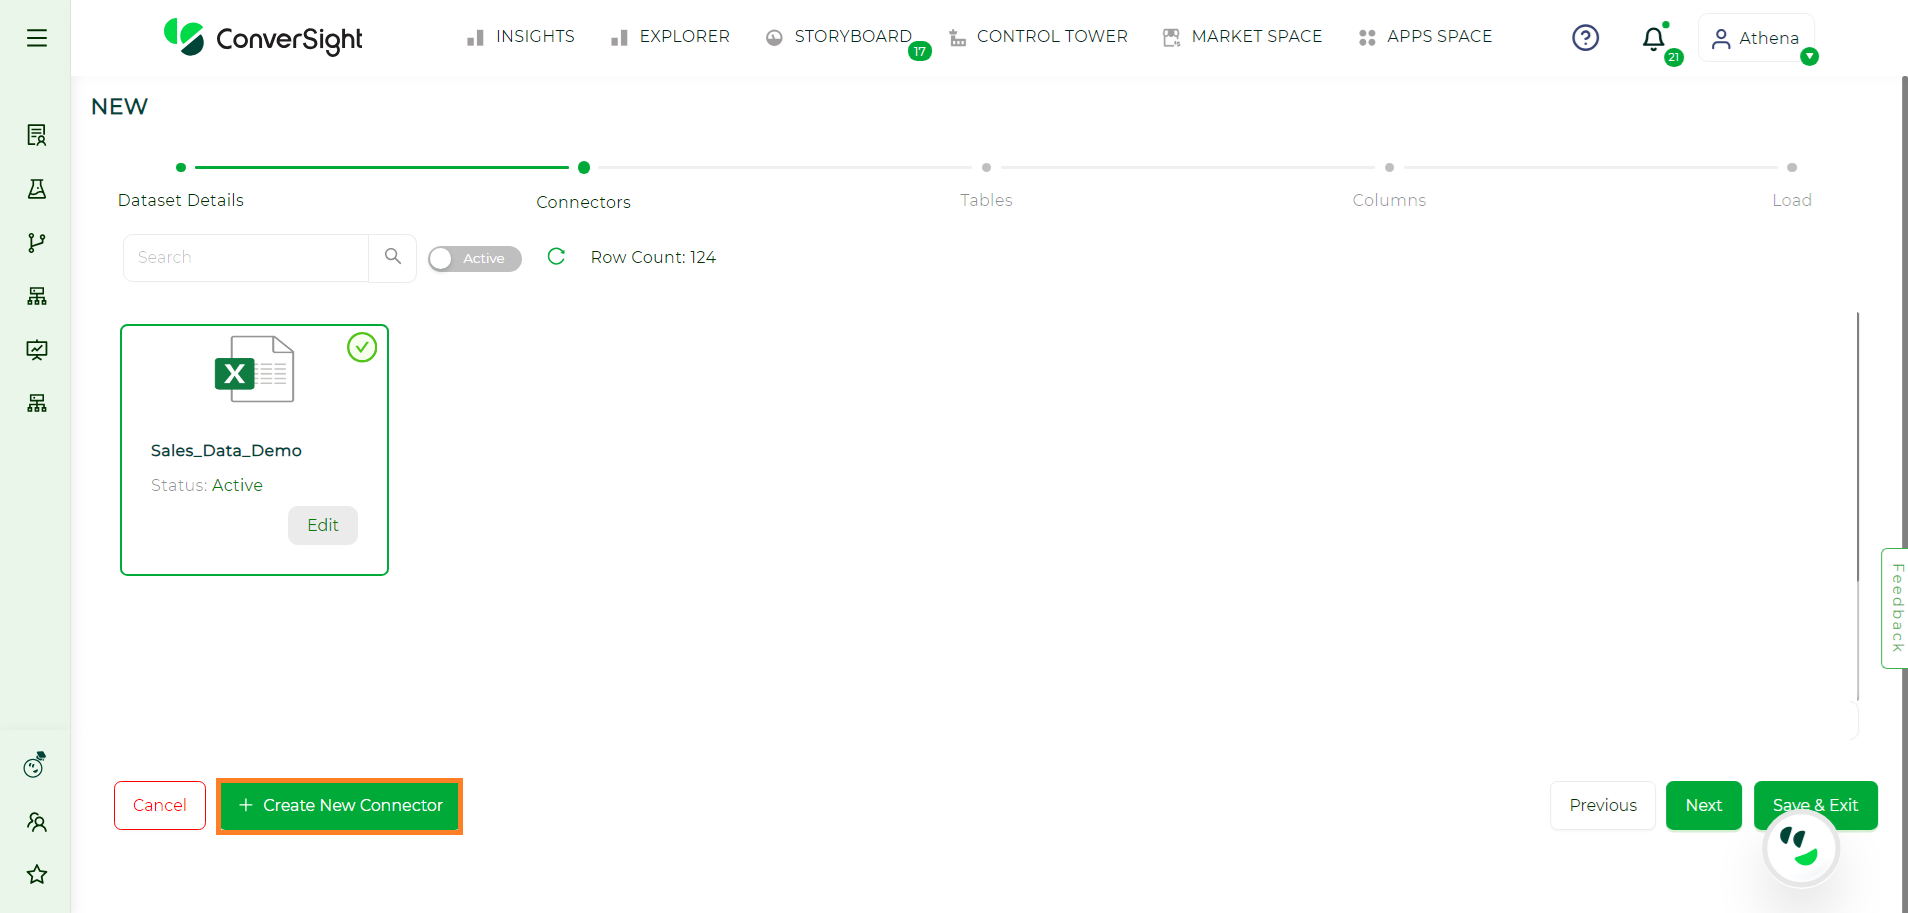
Selecting Connectors#
Tables#
Choose the tables you want to include in your Dataset and then click Next.
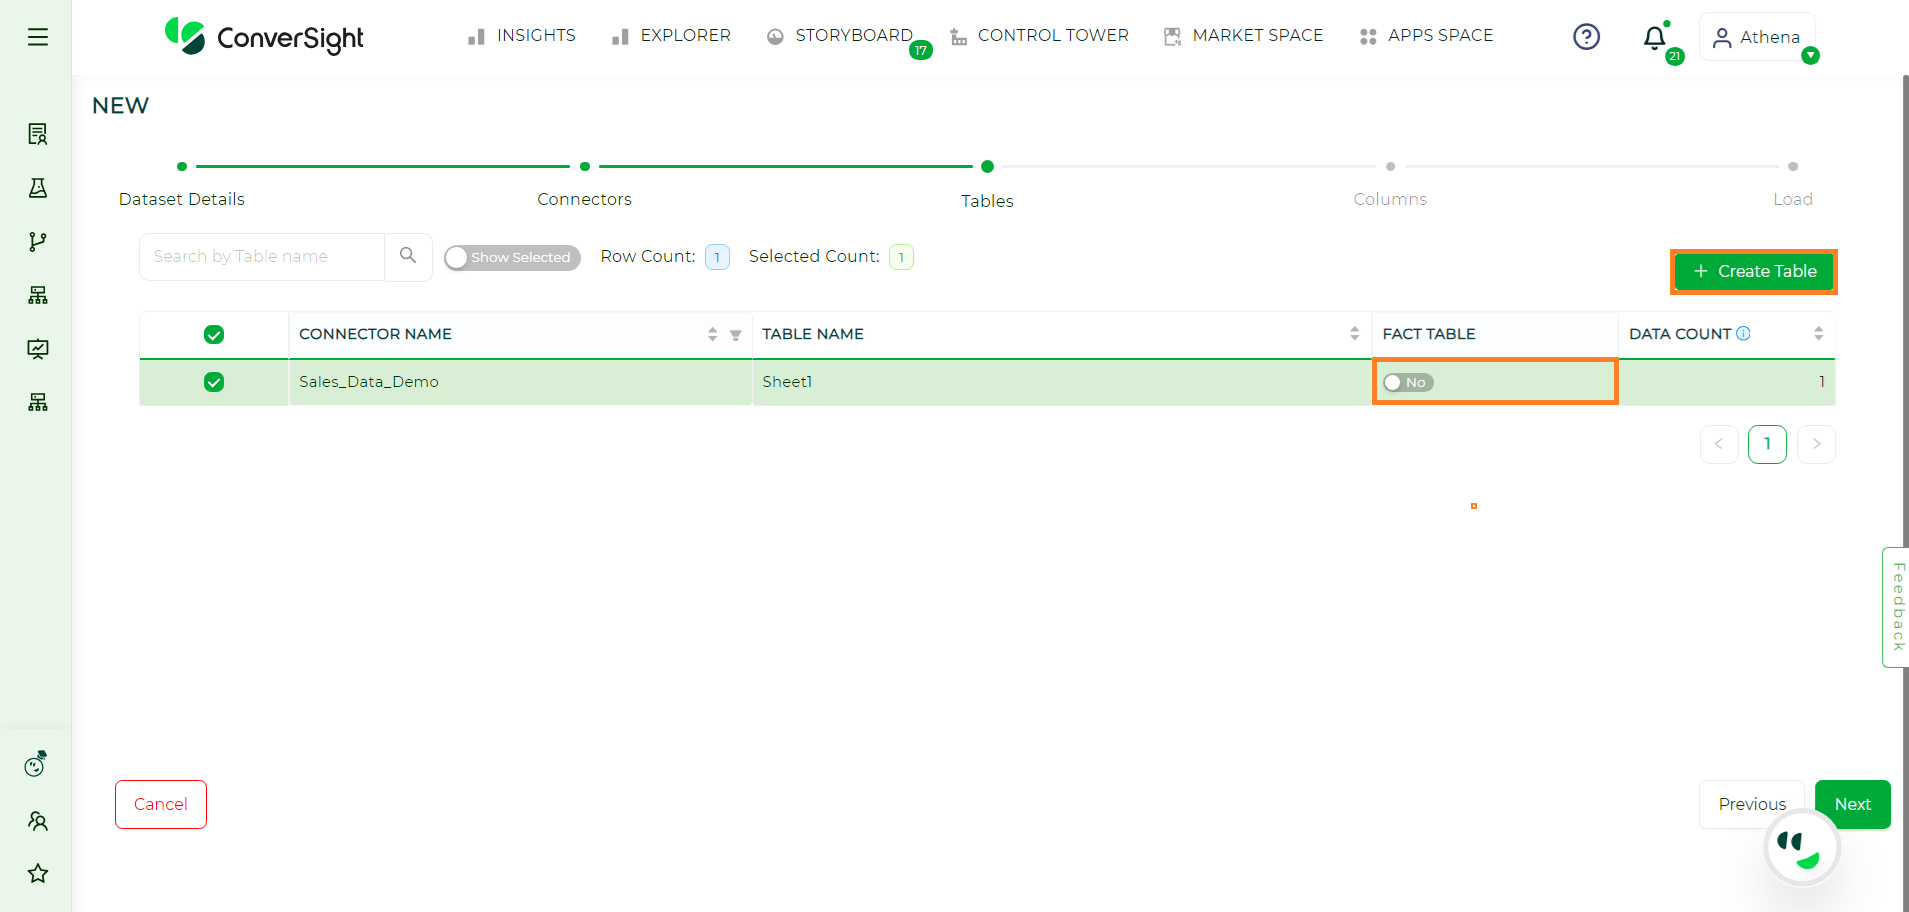
Selecting Tables#
In addition, users can choose to create a table by clicking on the Create Table option, to customize queries for filtering, providing precise control over the data retrieval process based on analysis requirements. This allows users to input SQL queries to retrieve tables, which is applicable to data connectors other than Excel. Users have the flexibility to enable or disable the Fact Table setting. When the Fact Table is enabled, it signifies that the table should not be used as the primary source of facts in the analysis. Conversely, when the setting is disabled, the table will be treated as the primary source of facts for analysis purposes.
NOTE
When the External Connector is activated, the Create Table option becomes disabled because the process of creating tables is directly accessible in the metadata.
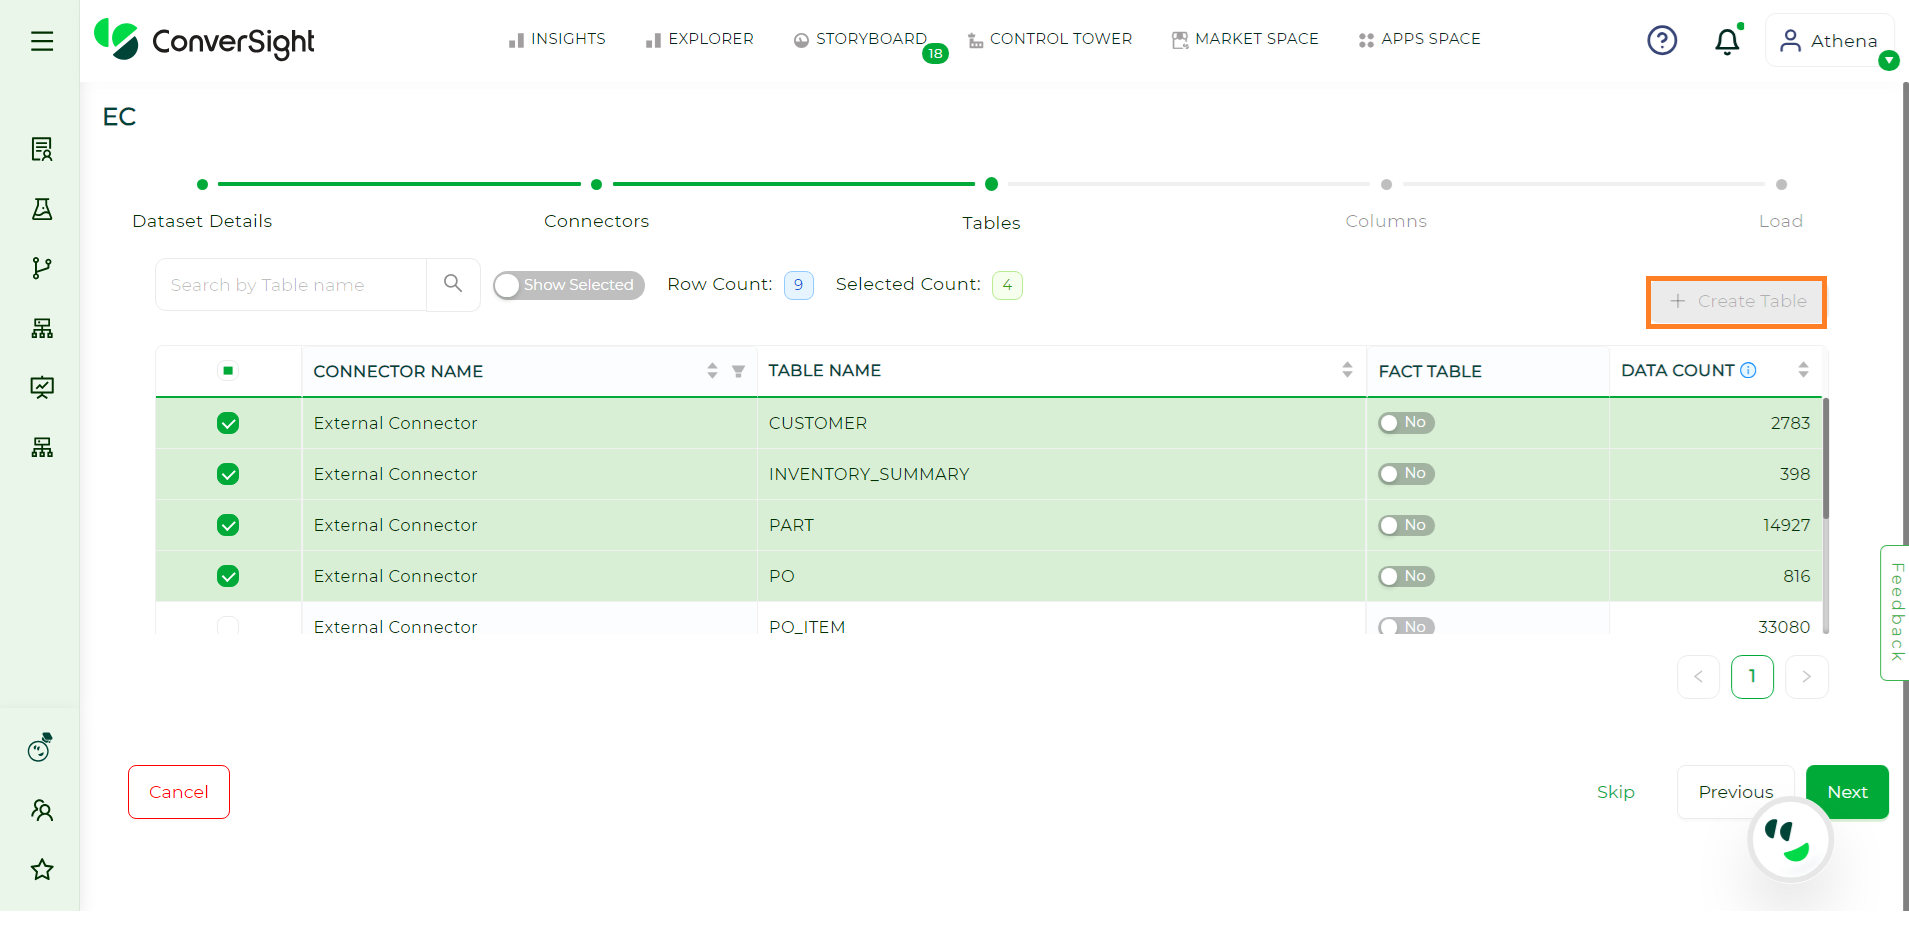
Create Table for External Connector#
Columns#
You can choose particular columns and alter their data type from the drop-down menu before clicking Next.
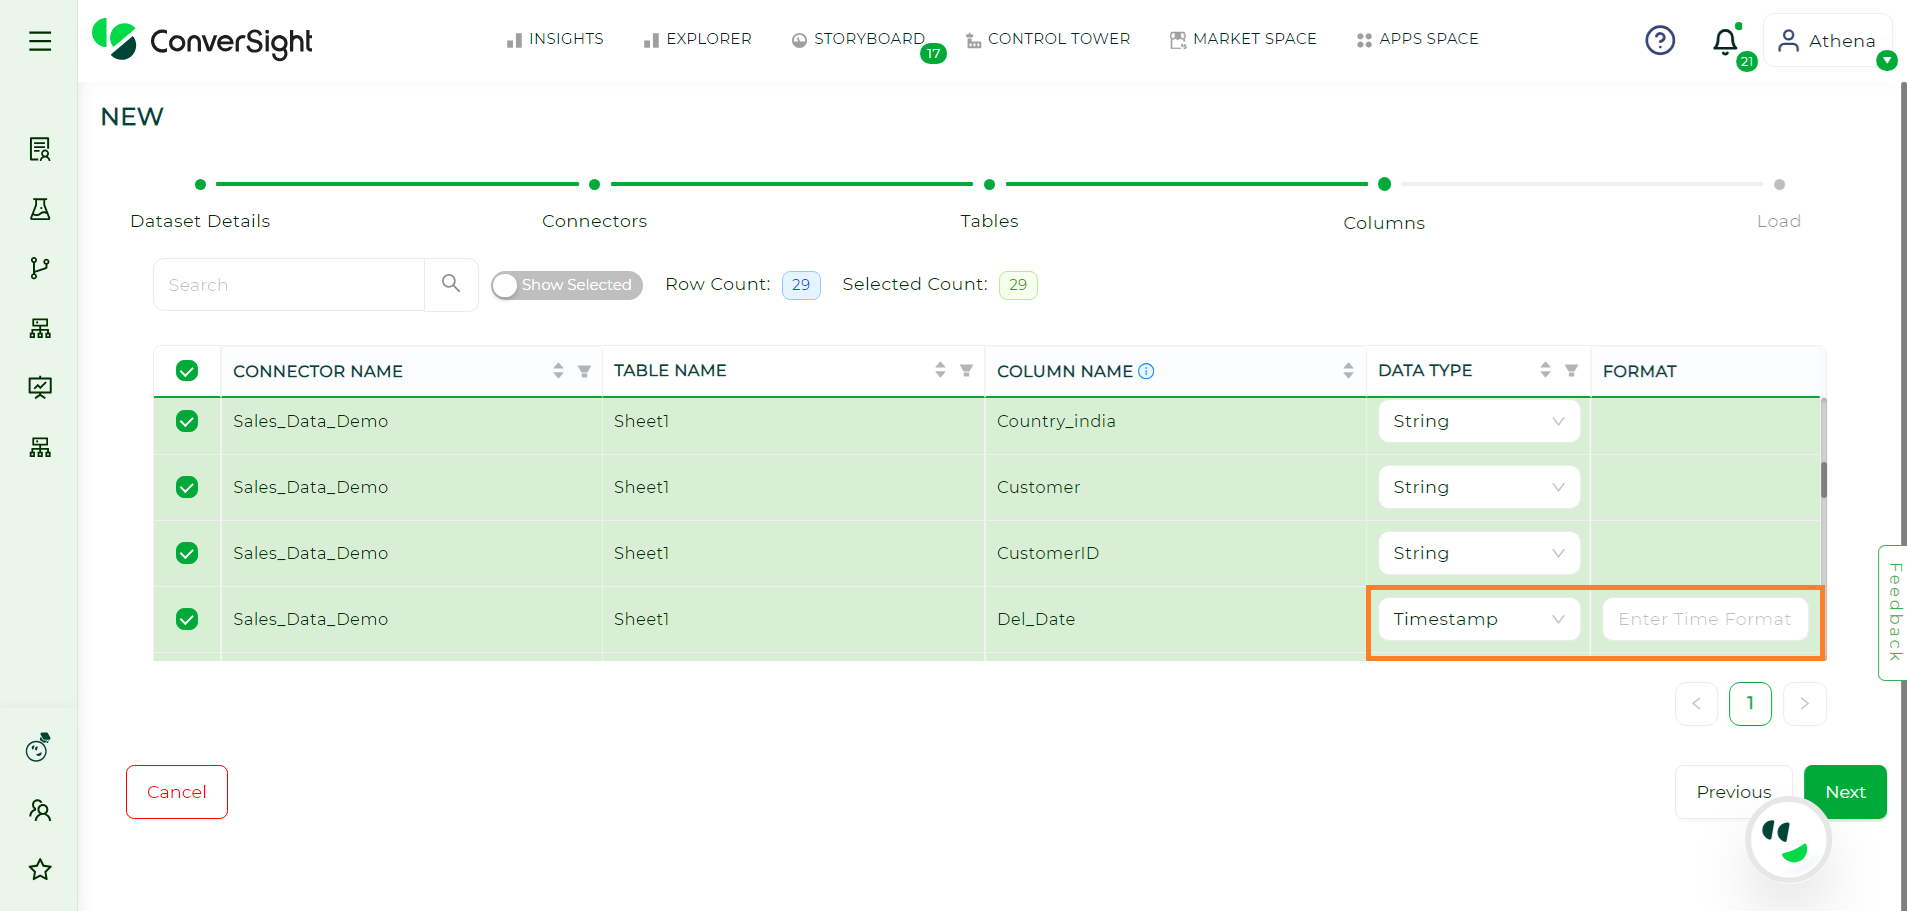
Selecting Columns#
When dealing with dates, it is crucial to accurately select the timestamp format.
Conditions and Constraints while loading Date Columns#
Constraints |
Description |
|---|---|
Data Type |
Ensure that the target column in your database or data processing system is defined with an appropriate date-related data type such as date, datetime or timestamp. Using the wrong data type can lead to errors or misinterpretations of the date values. If your data source provides dates in a different data type or if there is inconsistency in the data type, perform conversions to ensure uniformity. |
Format Consistency |
Enforce a consistent date format across all rows in the dataset. Inconsistent date formats, such as mixing DD/MM/YYYY and MM/DD/YYYY, can lead to errors or inaccuracies during data processing. Standardizing the format helps in maintaining data integrity and ensures that the system interprets the dates correctly. |
Null Handling |
Specify a standard representation for blank or empty values to ensure uniformity and prevent ambiguity. This step is essential for maintaining data consistency and avoiding issues during date-related calculations or comparisons. |
Regional Settings |
Consider regional date format conventions to avoid misinterpretations. For instance, in some regions, the date format might be MM/DD/YYYY, while in others, it could be DD/MM/YYYY. Be aware of these variations and ensure that your system is configured to correctly interpret and process dates based on the regional settings of the data. |
Load#
After successfully completing the creation process of your dataset, it is now ready for loading. Simply click on the Load button to initiate the loading process.
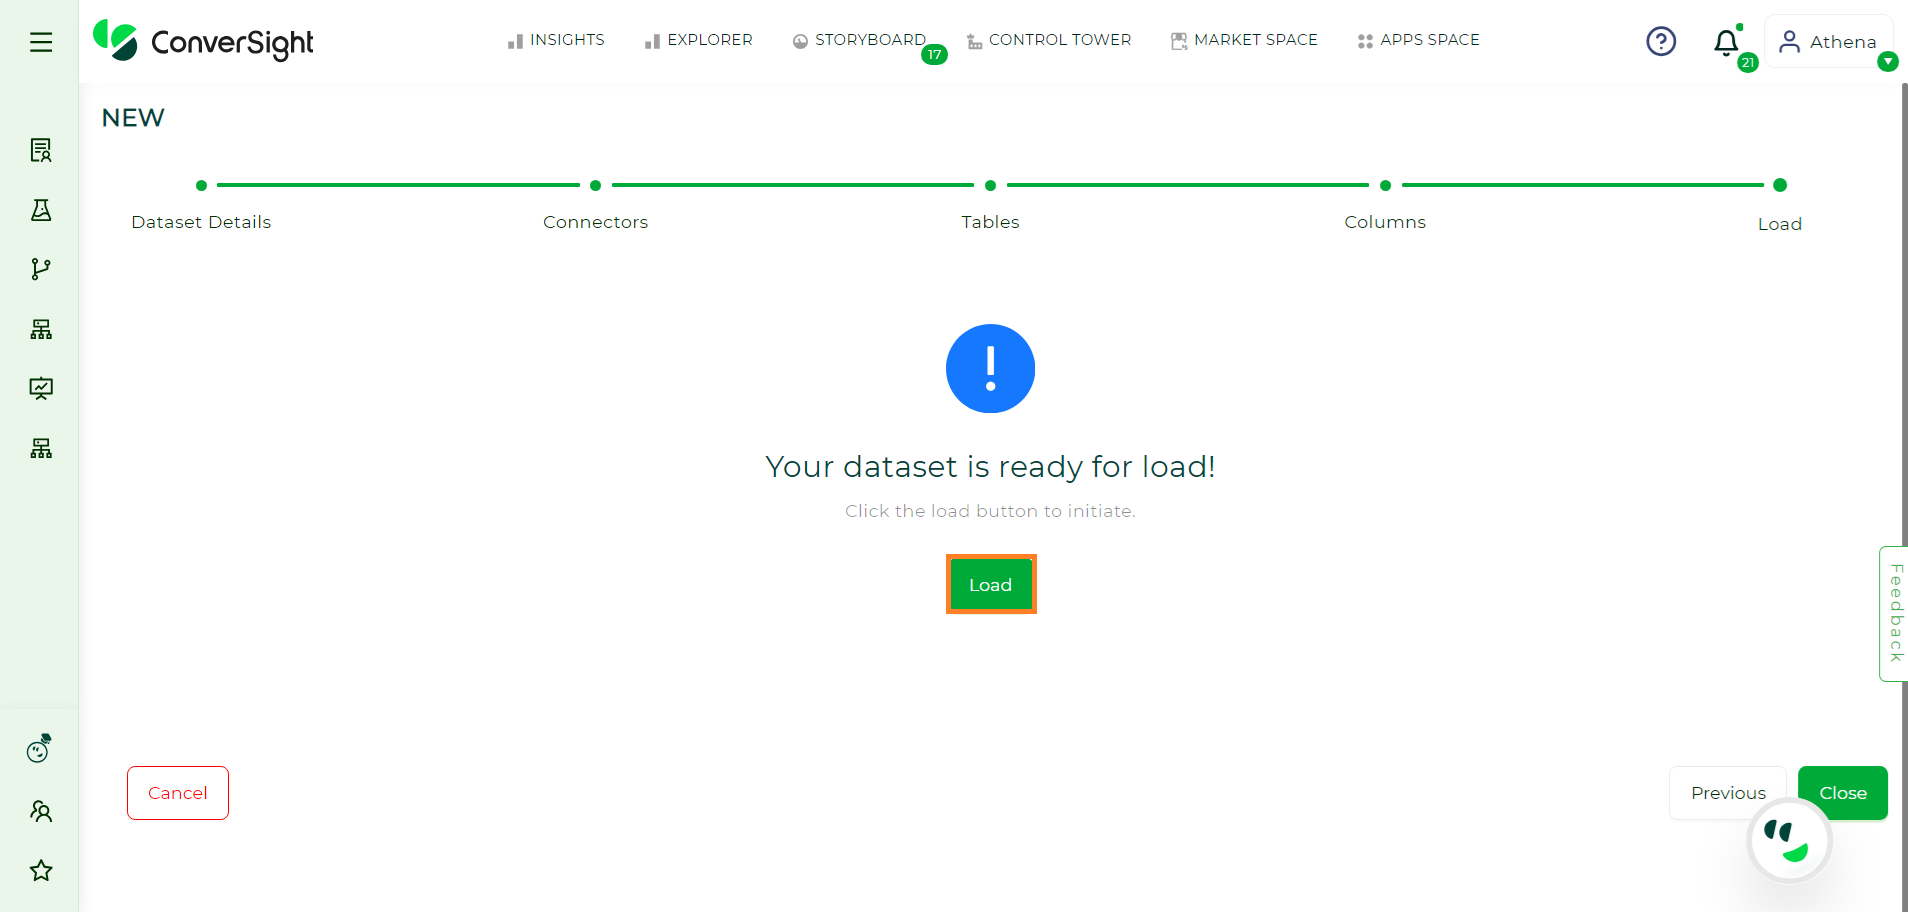
Dataset Load#
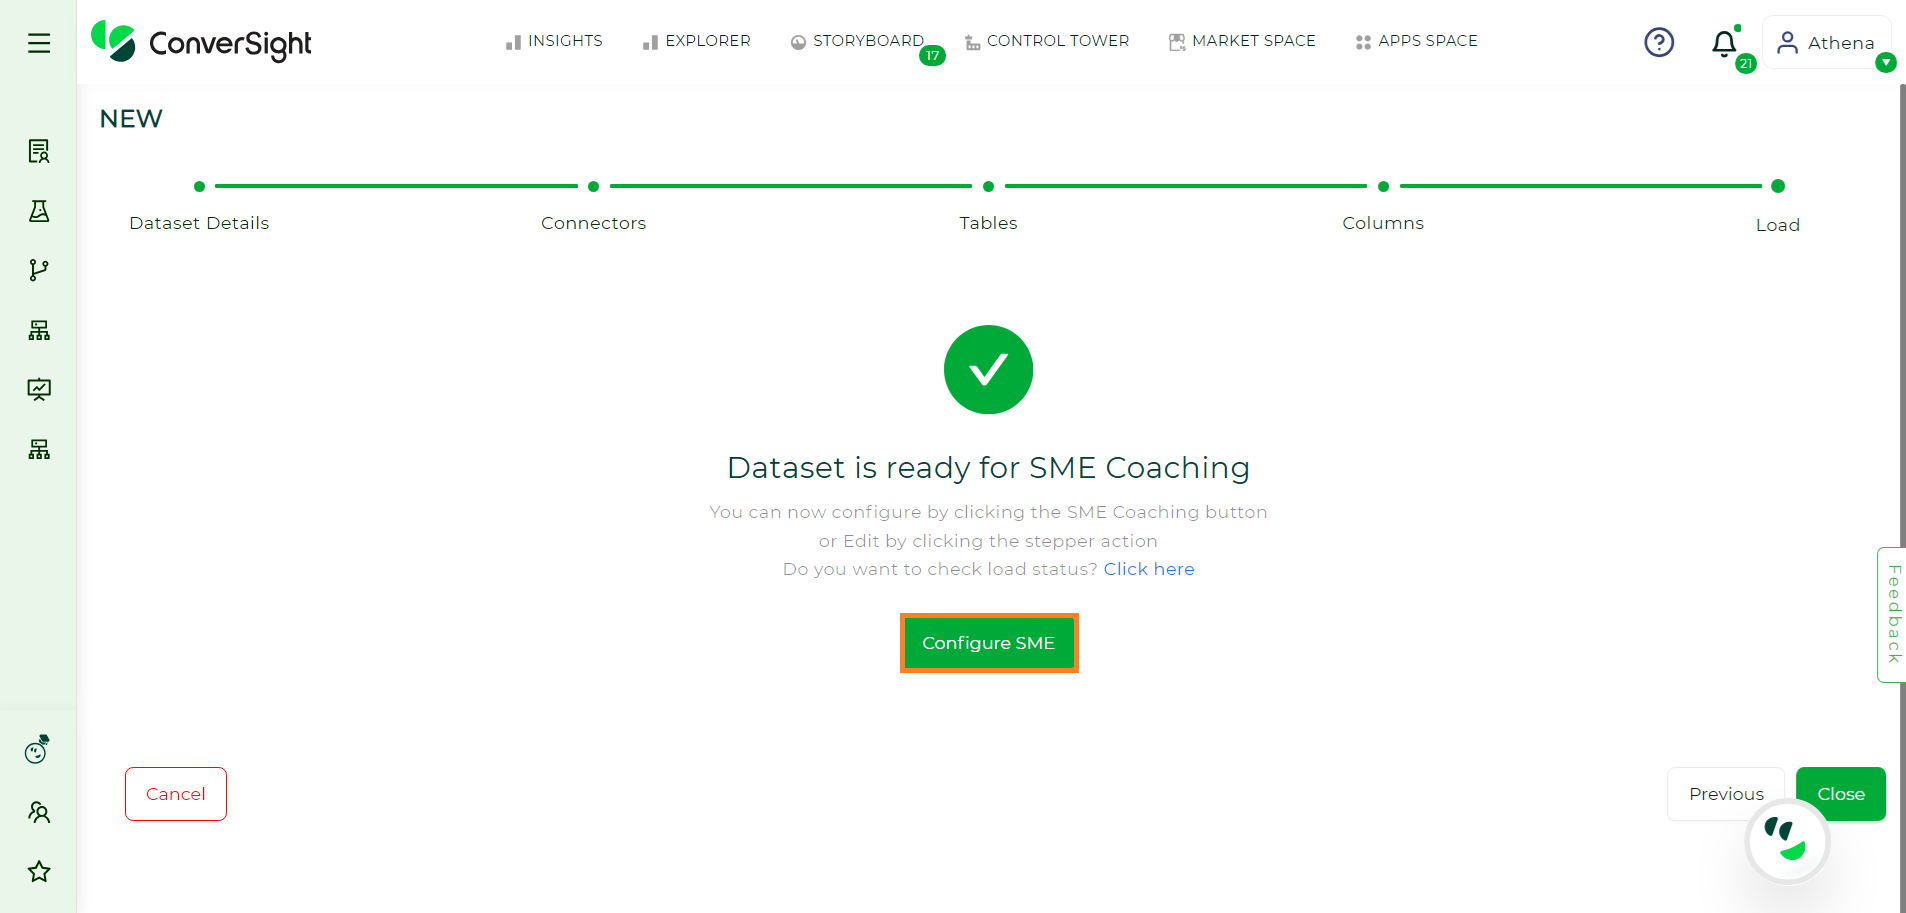
Dataset Ready#
Once the dataset is loaded, you will receive an email regarding the status of the loading process at the email address provided on the Dataset Details page. Click on Configure SME to configure the settings for training Athena and AI/ML models.
Configure SME#
By selecting Configure SME, you initiate the process of configuring your data. The detailed steps for this configuration are provided here. Once you have completed all the necessary configurations, proceed to click on the Publish button.
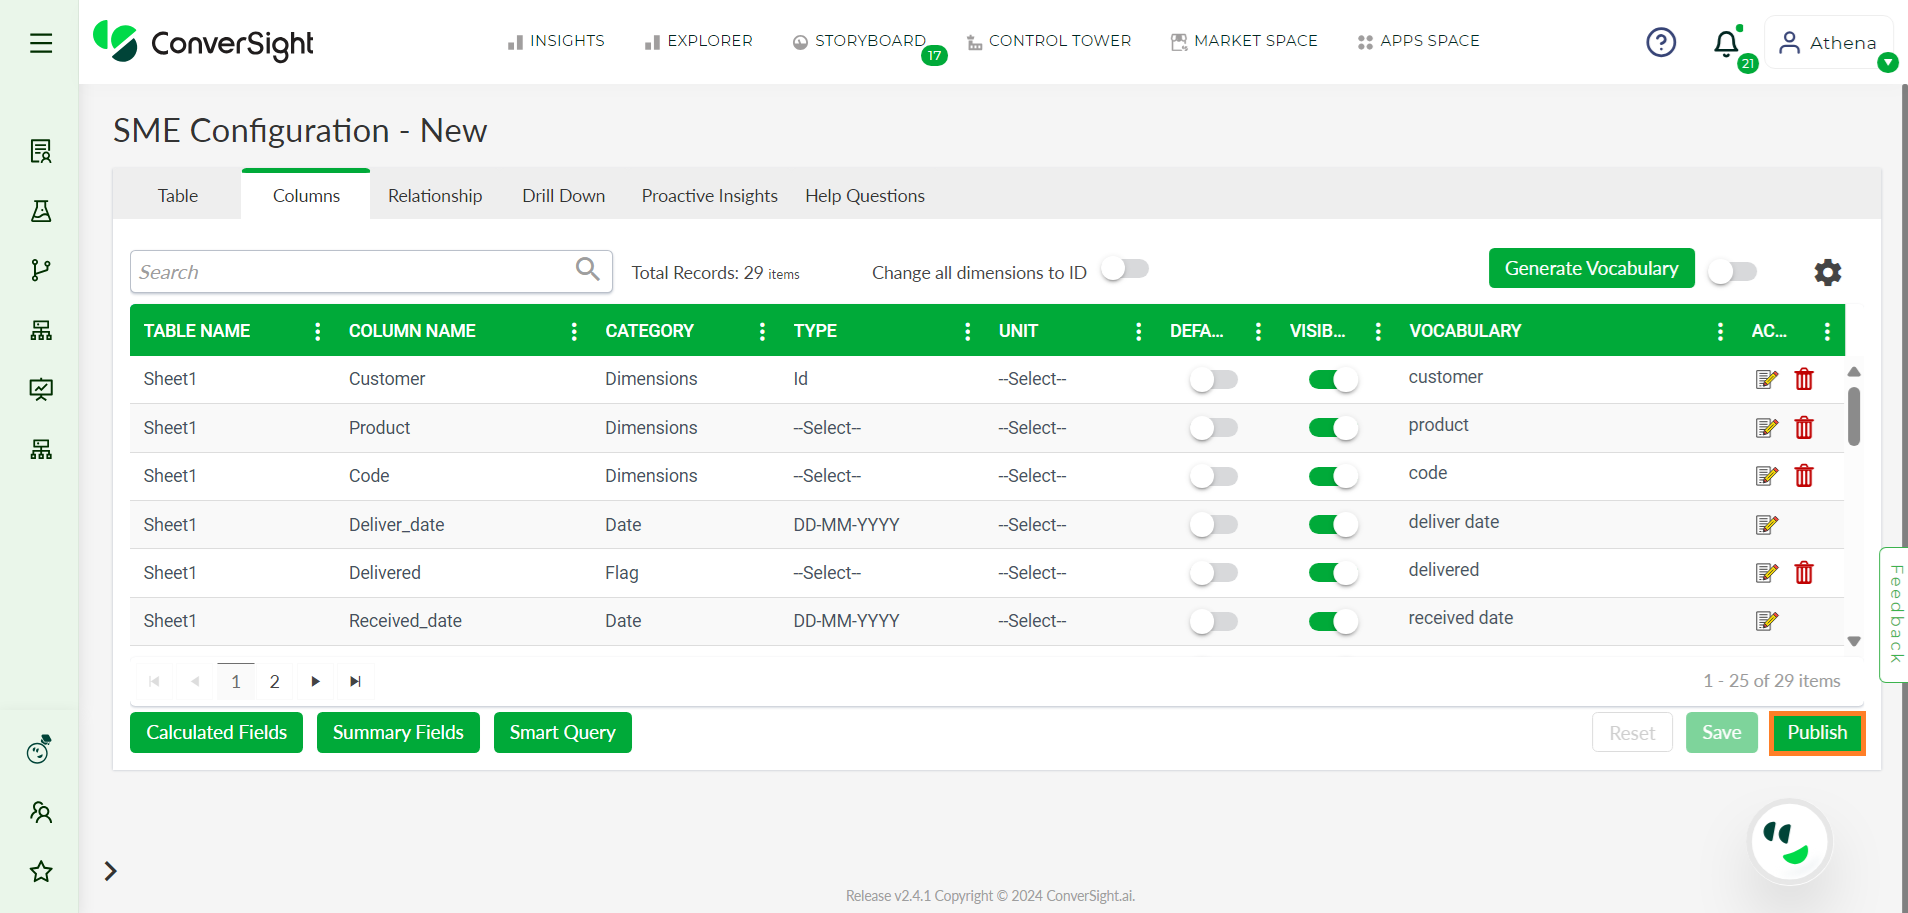
Configure SME Page#
Upon publishing your data, you can start querying Athena by checking the status of your dataset. Athena queries can be executed when your dataset is in active status.
Activity Status#
To check the activity status of your dataset,
Navigate to the Data Workbench menu and choose Data Management.
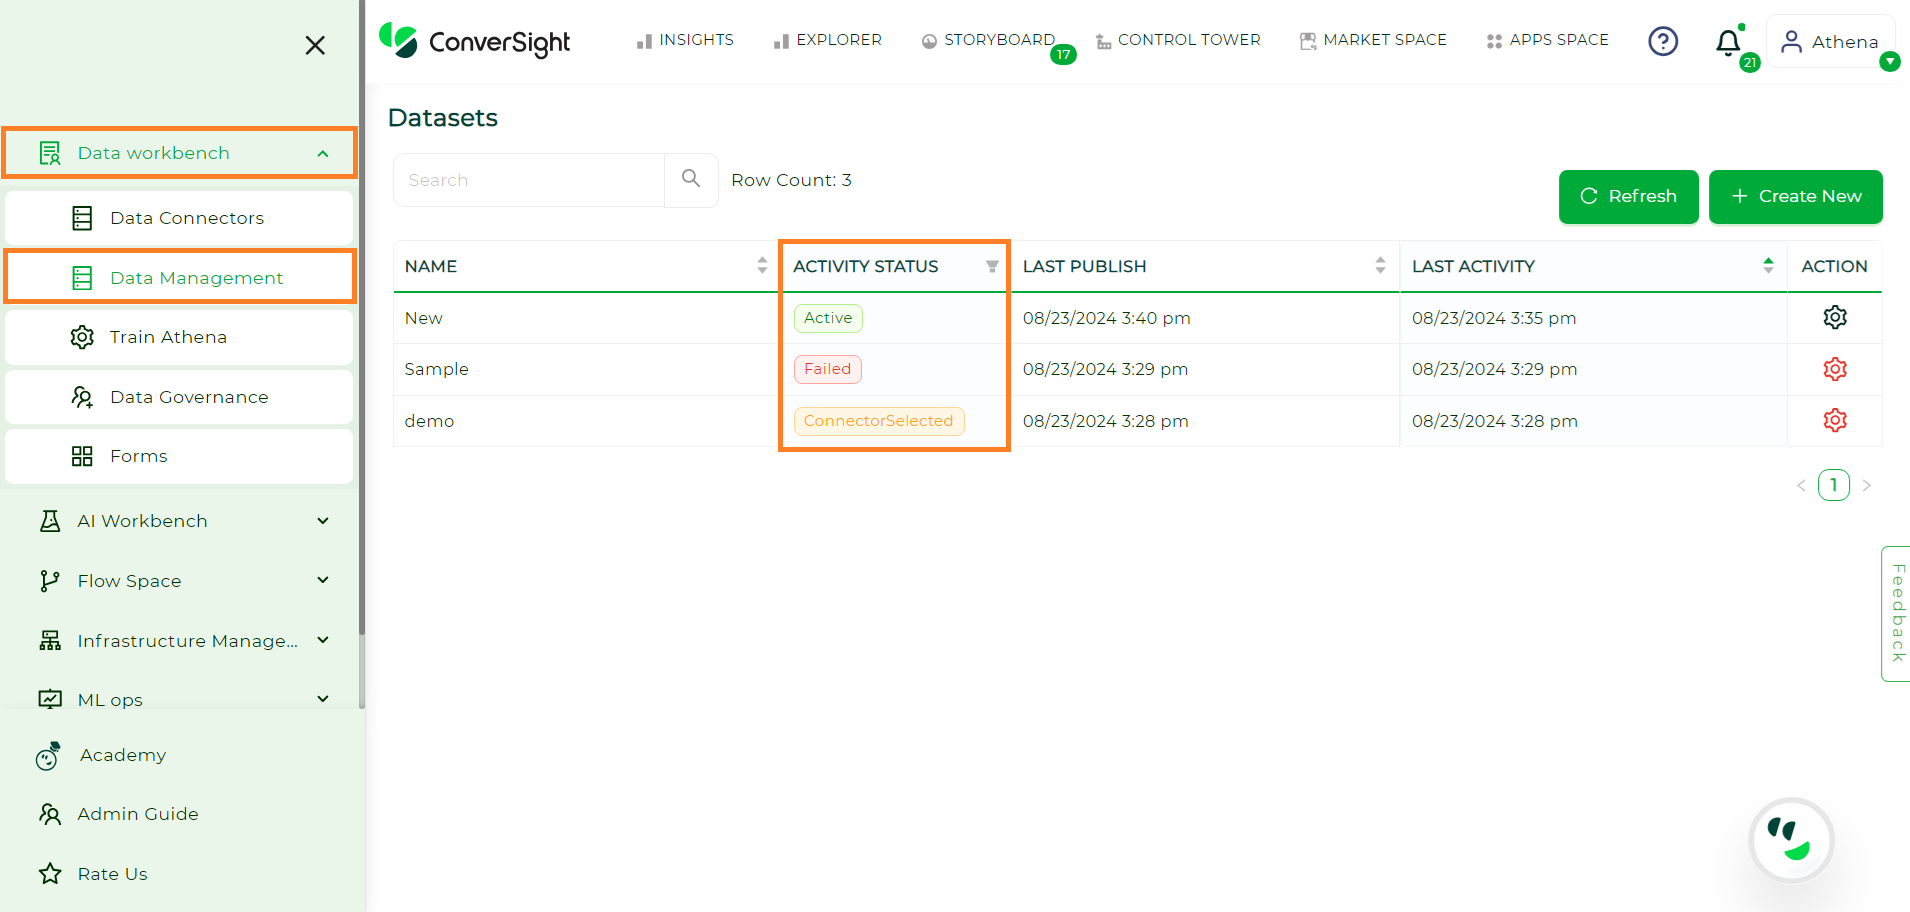
Activity Status#
The table offered provides information about the various activity statuses linked to your dataset.
Status |
Description |
|---|---|
Created |
Upon providing the dataset details and clicking on Next, the dataset is assigned a Created status. |
Connector Selected |
Choosing a connector for your dataset changes the dataset status to Connector Selected. |
Table Selected |
After selecting the required tables for the dataset, the status changes from Connector Selected to Table Selected. |
Load Requested |
During this status, a connection is established with the data source, tables are retrieved and the loading process into ConverSight is initiated. |
Data Loaded |
In this status, Smart Analytics and Smart Query refresh operations are performed to prepare and enable accessible data for analysis. |
Configure SME |
This status, occurring only during the first dataset load, allows users to modify metadata if needed. |
Dictionary Requested |
During this status, a customized knowledge base dictionary is generated for the loaded data, facilitating efficient data management. |
Dictionary Updated |
Entity values within dimension columns are converted to a format used to establish the Knowledge Graph before being loaded into the storage system. |
Failed Dependency |
The connector status shifts to “Failed Dependency” if required tables on which the connector relies are not present. |
Active |
The Dataset’s status becomes Active, indicating the dataset’s readiness for use. |
Failed |
If data is not loaded correctly, the connector enters a failed status. |
NOTE
Once the dataset becomes active, an email notification will be sent to inform you, ensuring you are promptly updated and can proceed with further actions or analysis.
At this stage, Athena is set up and prepared to address your queries, enabling you to engage with the dataset and obtain the information or insights you seek.
Last Publish#
The Last Publish column furnishes information regarding the most recent publication timestamp of your dataset.
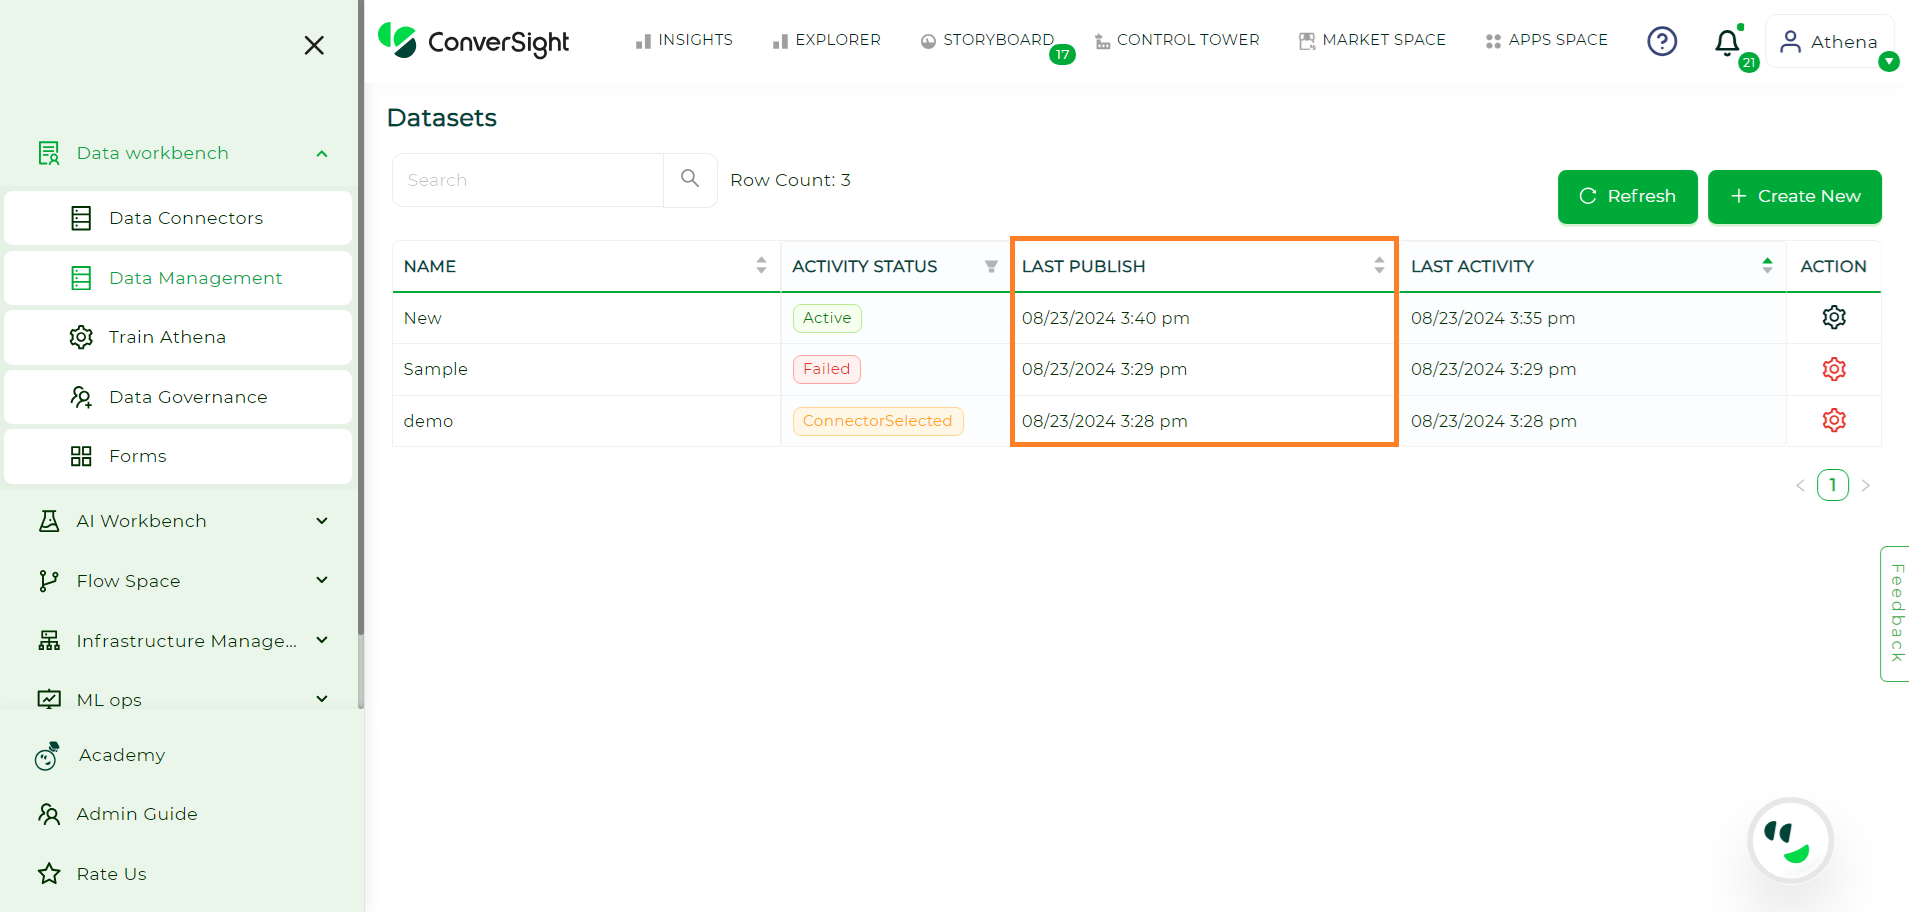
Last Publish#
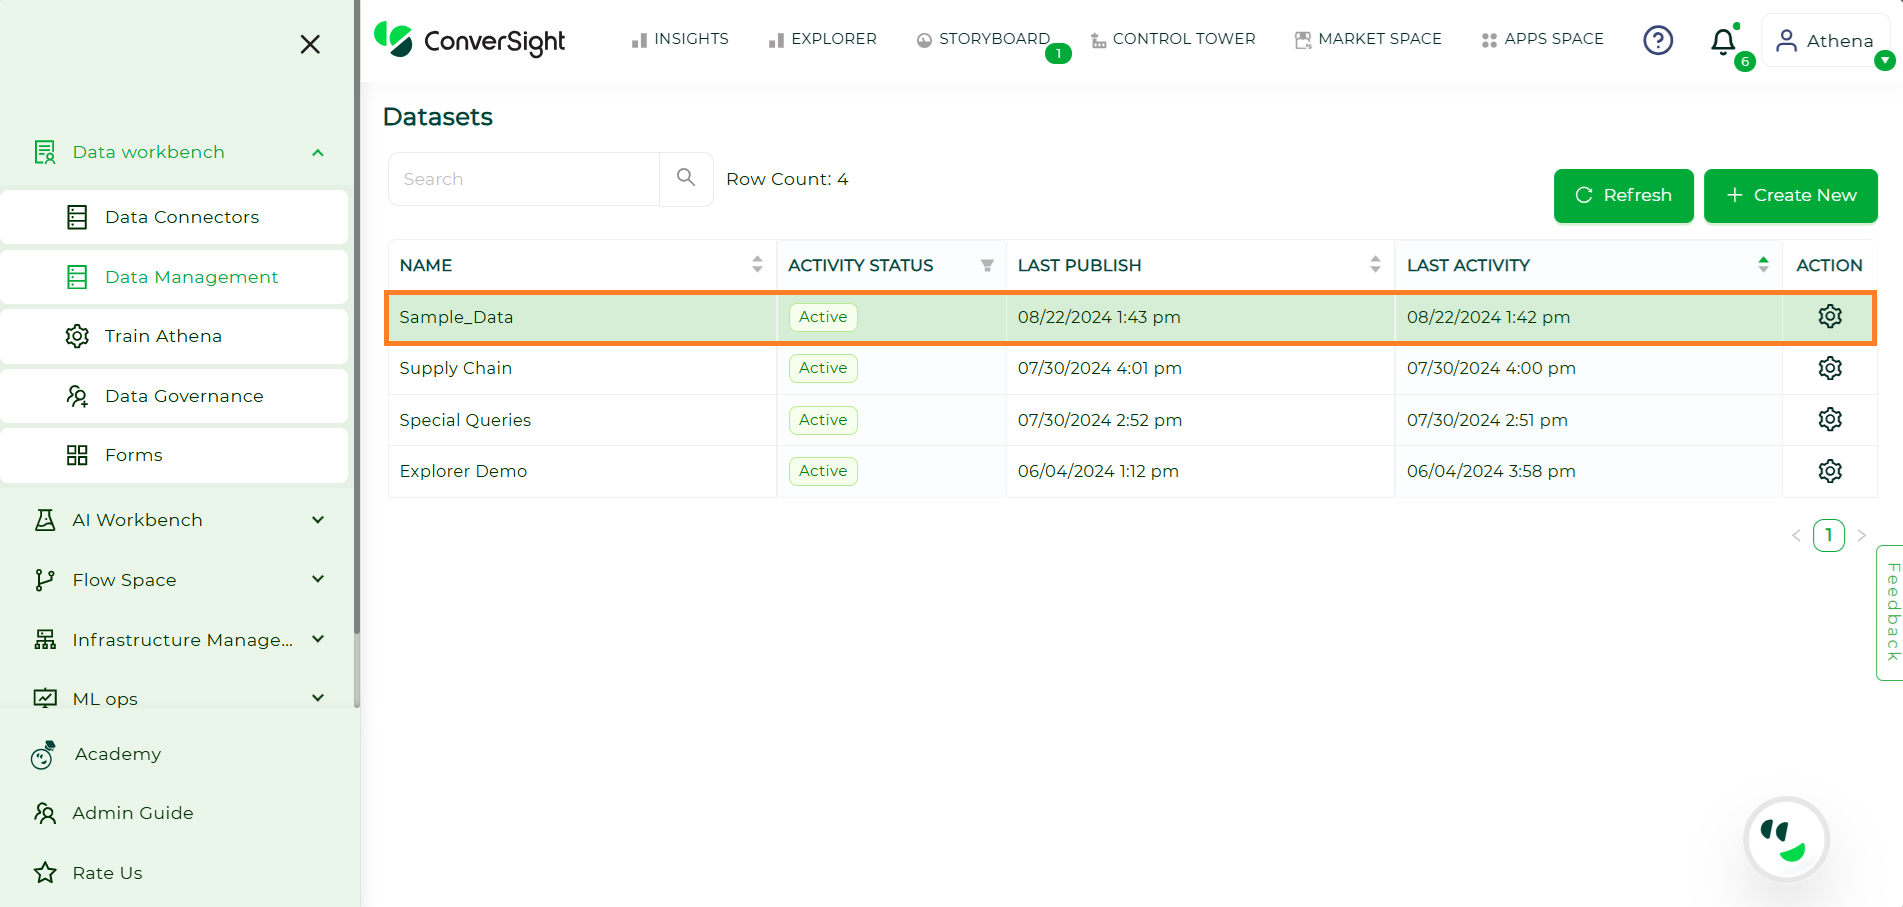
Last Activity#
The Last Activity column offers details about the most recent activity performed on your dataset, providing information about the latest actions or modifications made to the dataset.
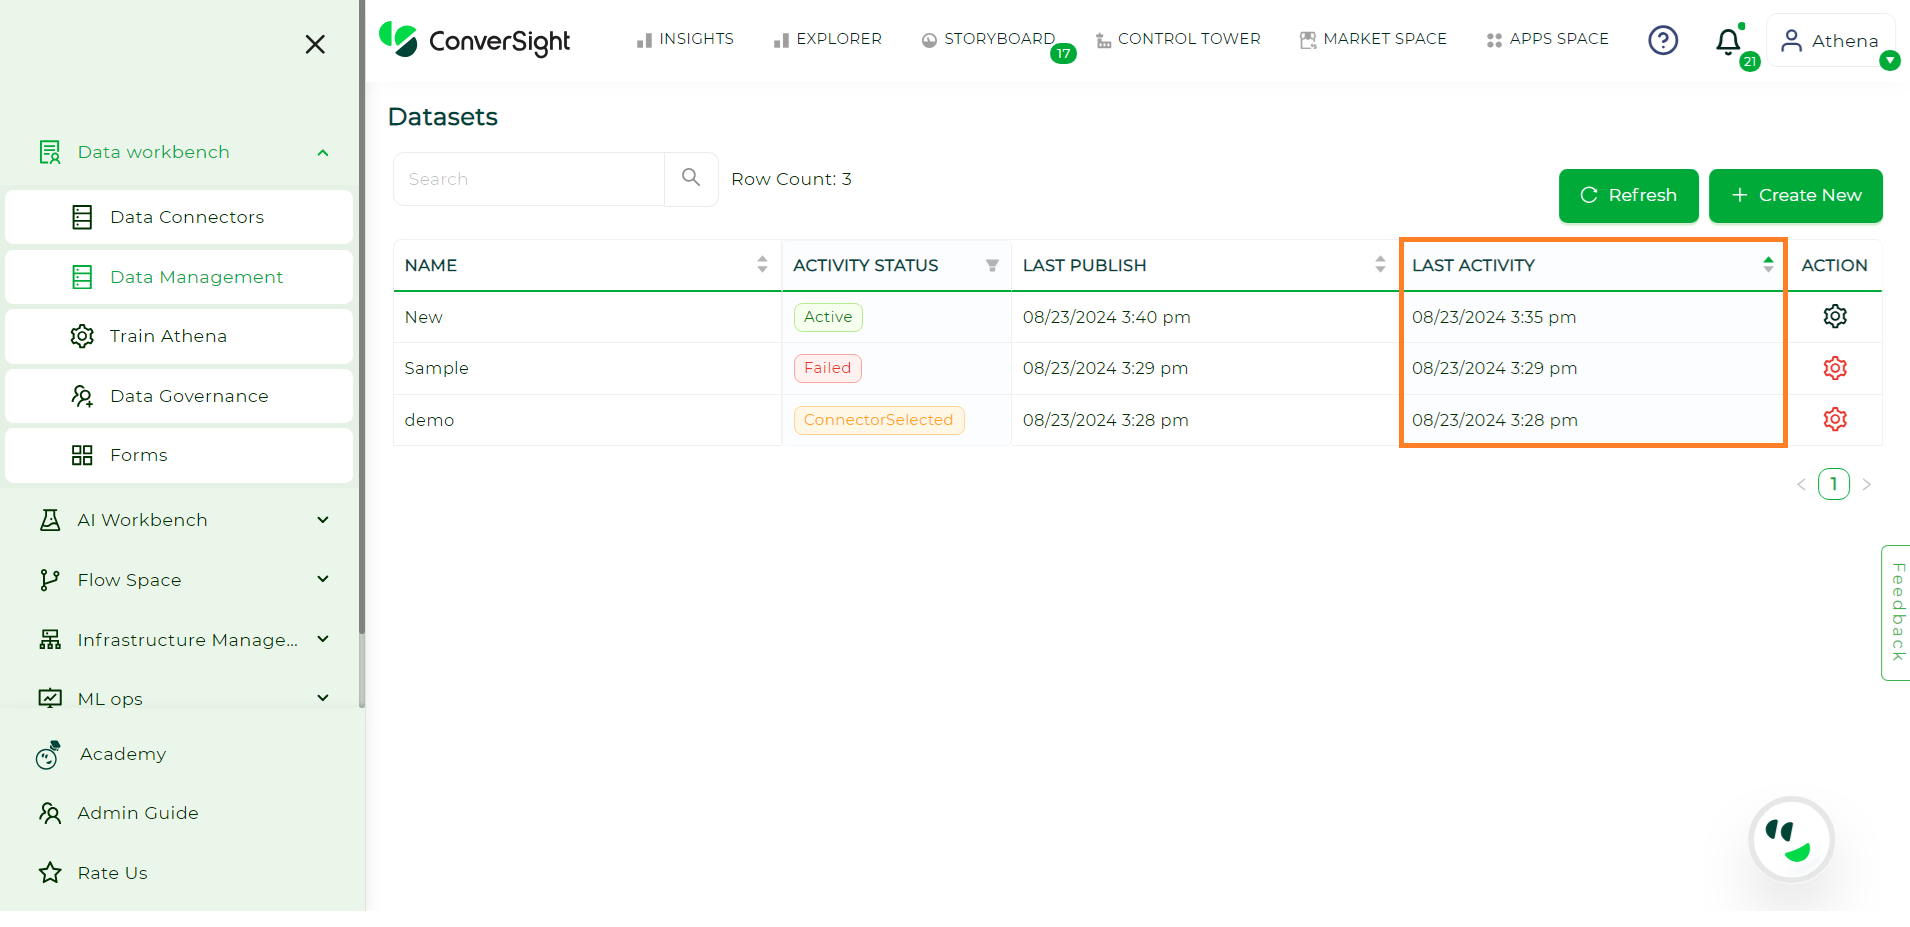
Last Activity#
Action Column#
In the Action Column, you can empower your dataset creation process with the flexibility to adapt to evolving needs.
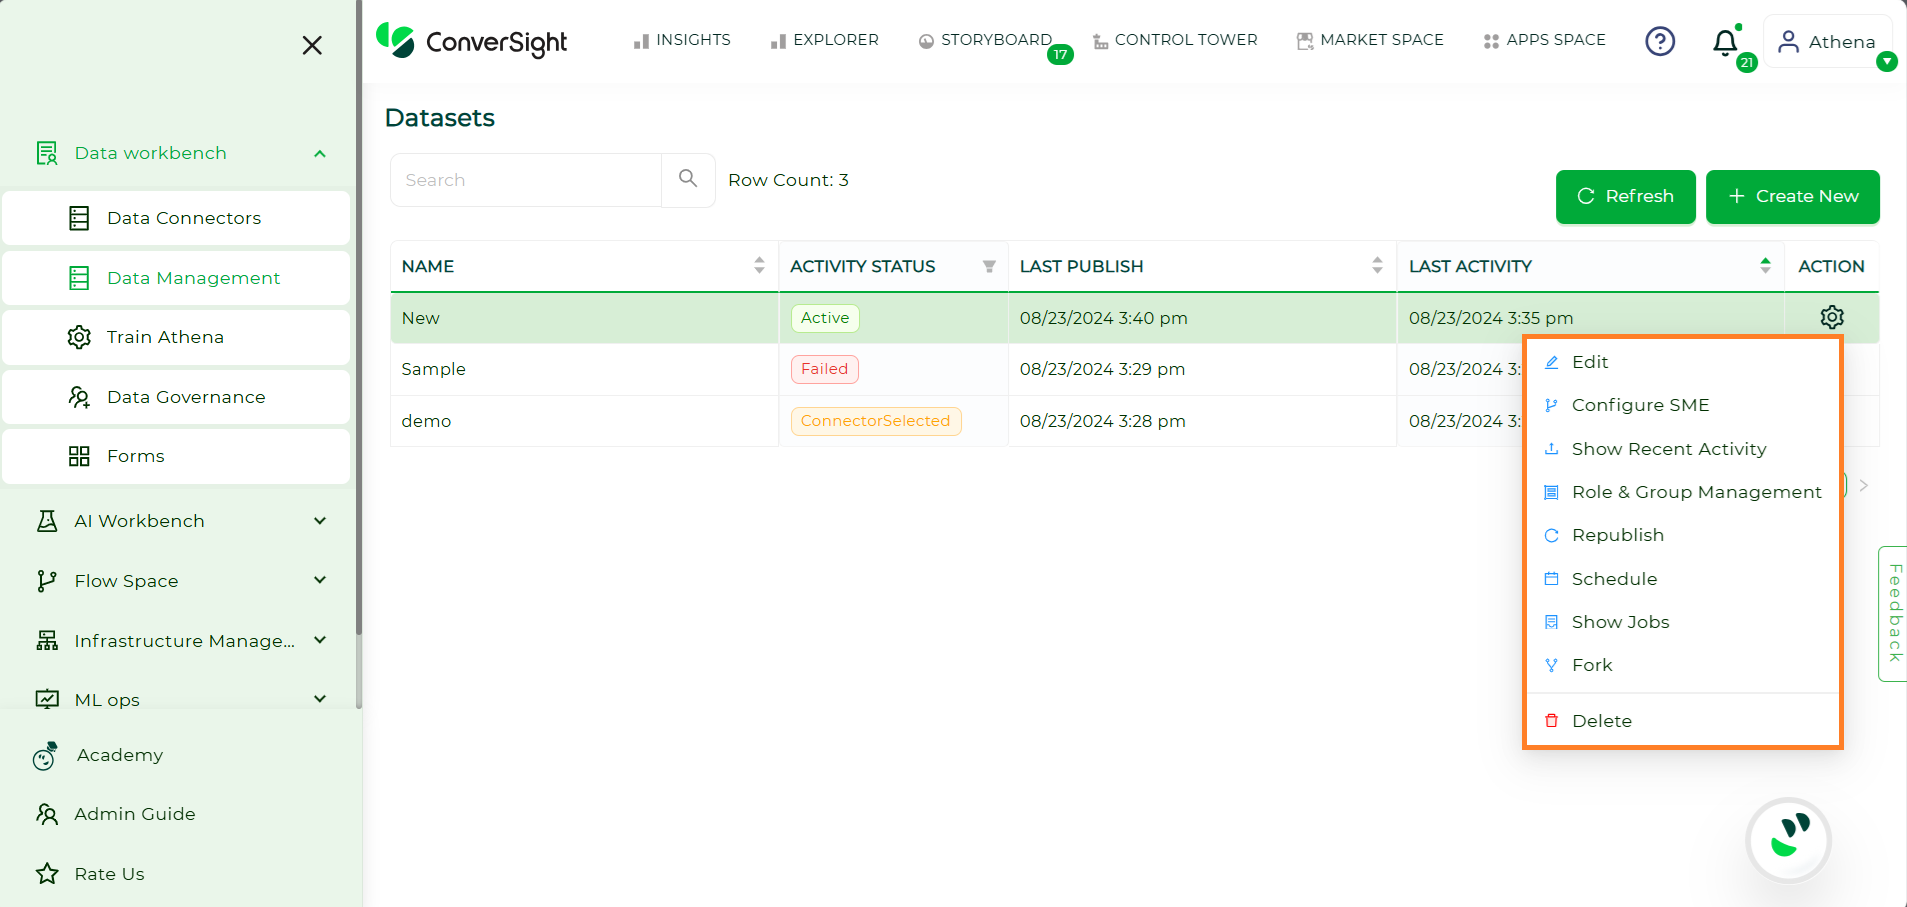
Action Column#
Action |
Description |
|---|---|
You have the ability to modify or make changes to your dataset creation process. This flexibility allows you to update or refine the dataset creation steps based on your evolving requirements or preferences. |
|
Provides the capability to tailor Subject Matter Expert (SME) coaching. This includes the ability to train Athena. |
|
You can view the latest recent activities of your datasets. This feature provides you with a display of the most actions, allowing you to stay informed about recent happenings. |
|
You have the ability to create and manage roles and groups within your organization. This allows you to customize your organizational structure, providing flexibility in assigning responsibilities and streamlining collaboration for effective management. |
|
You have the ability to republish your available dataset. |
|
You have the option to set a schedule for publishing your dataset at intervals such as hourly, daily, weekly or monthly. |
|
You can monitor the status of jobs related to your dataset. |
|
You can generate a clone of your dataset for any intended purpose, allowing you to have a duplicate copy for diverse uses. |
|
Delete |
You have the option to permanently delete or remove your dataset. |
To watch the video, click on Refreshing your dataset.
Show Recent Activity#
To view latest updates of a dataset, you can follow these steps:
Hover over the dataset’s Settings icon and click on the Show Recent Activity option.
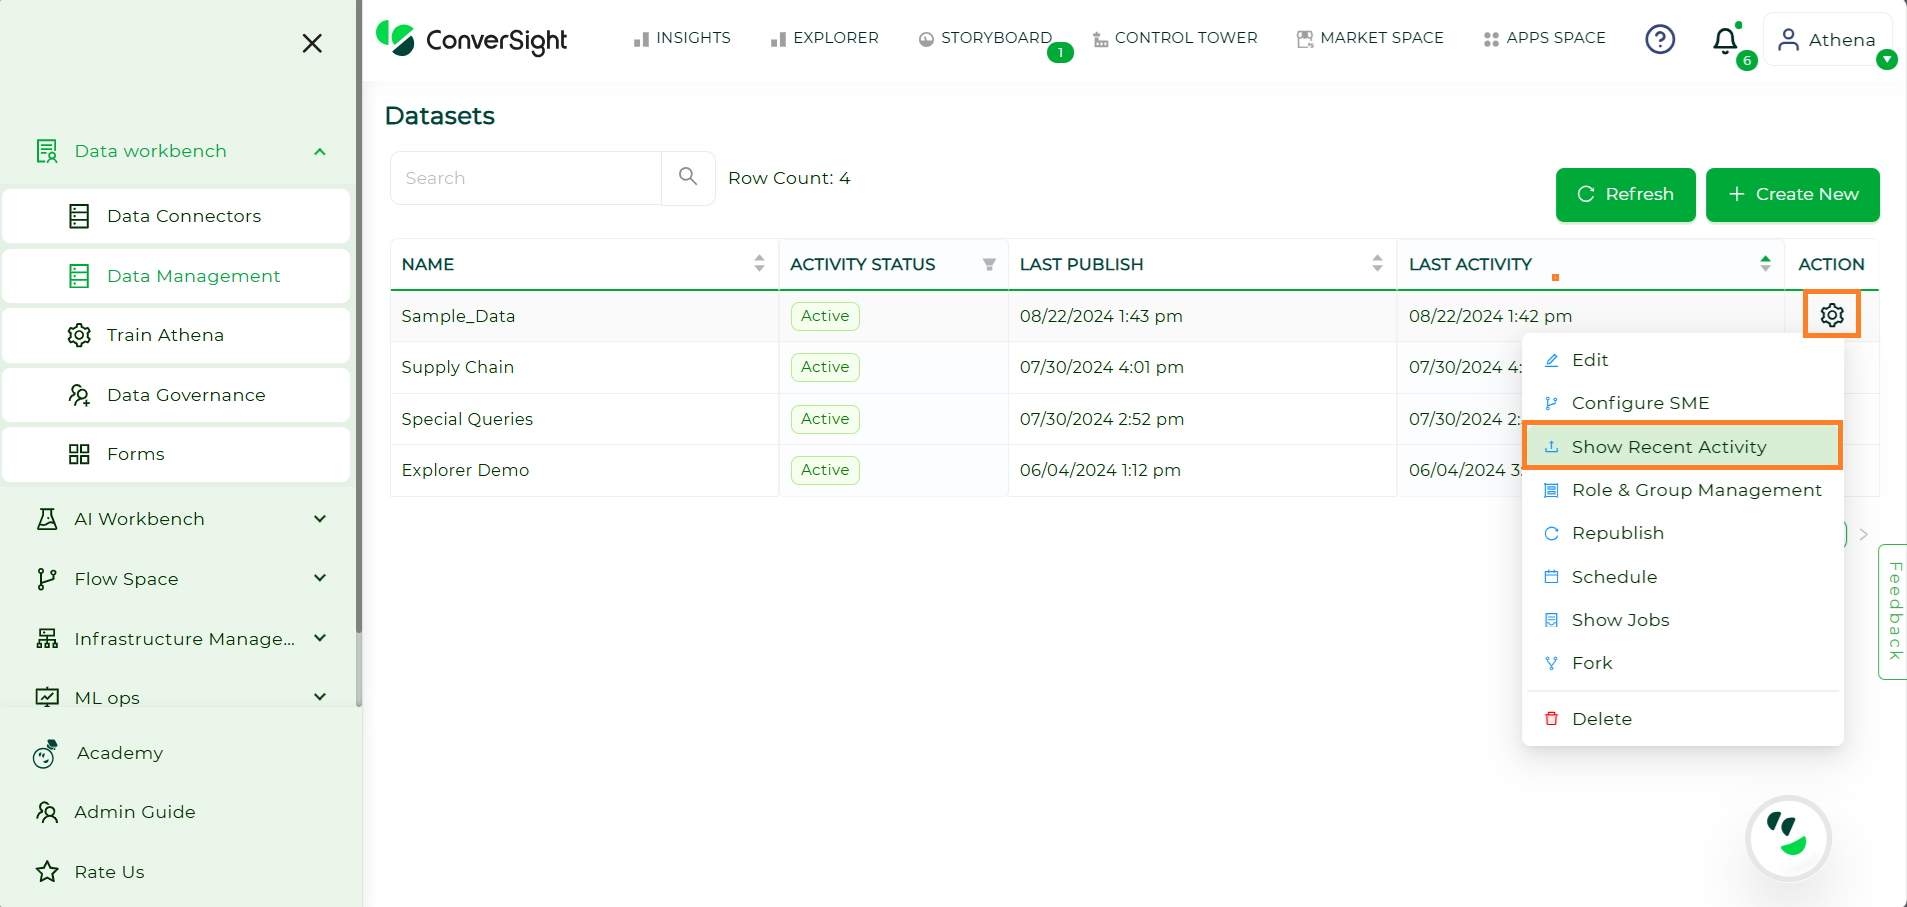
Show Recent Activity#
This will display all recent actions that took place on that specific dataset.
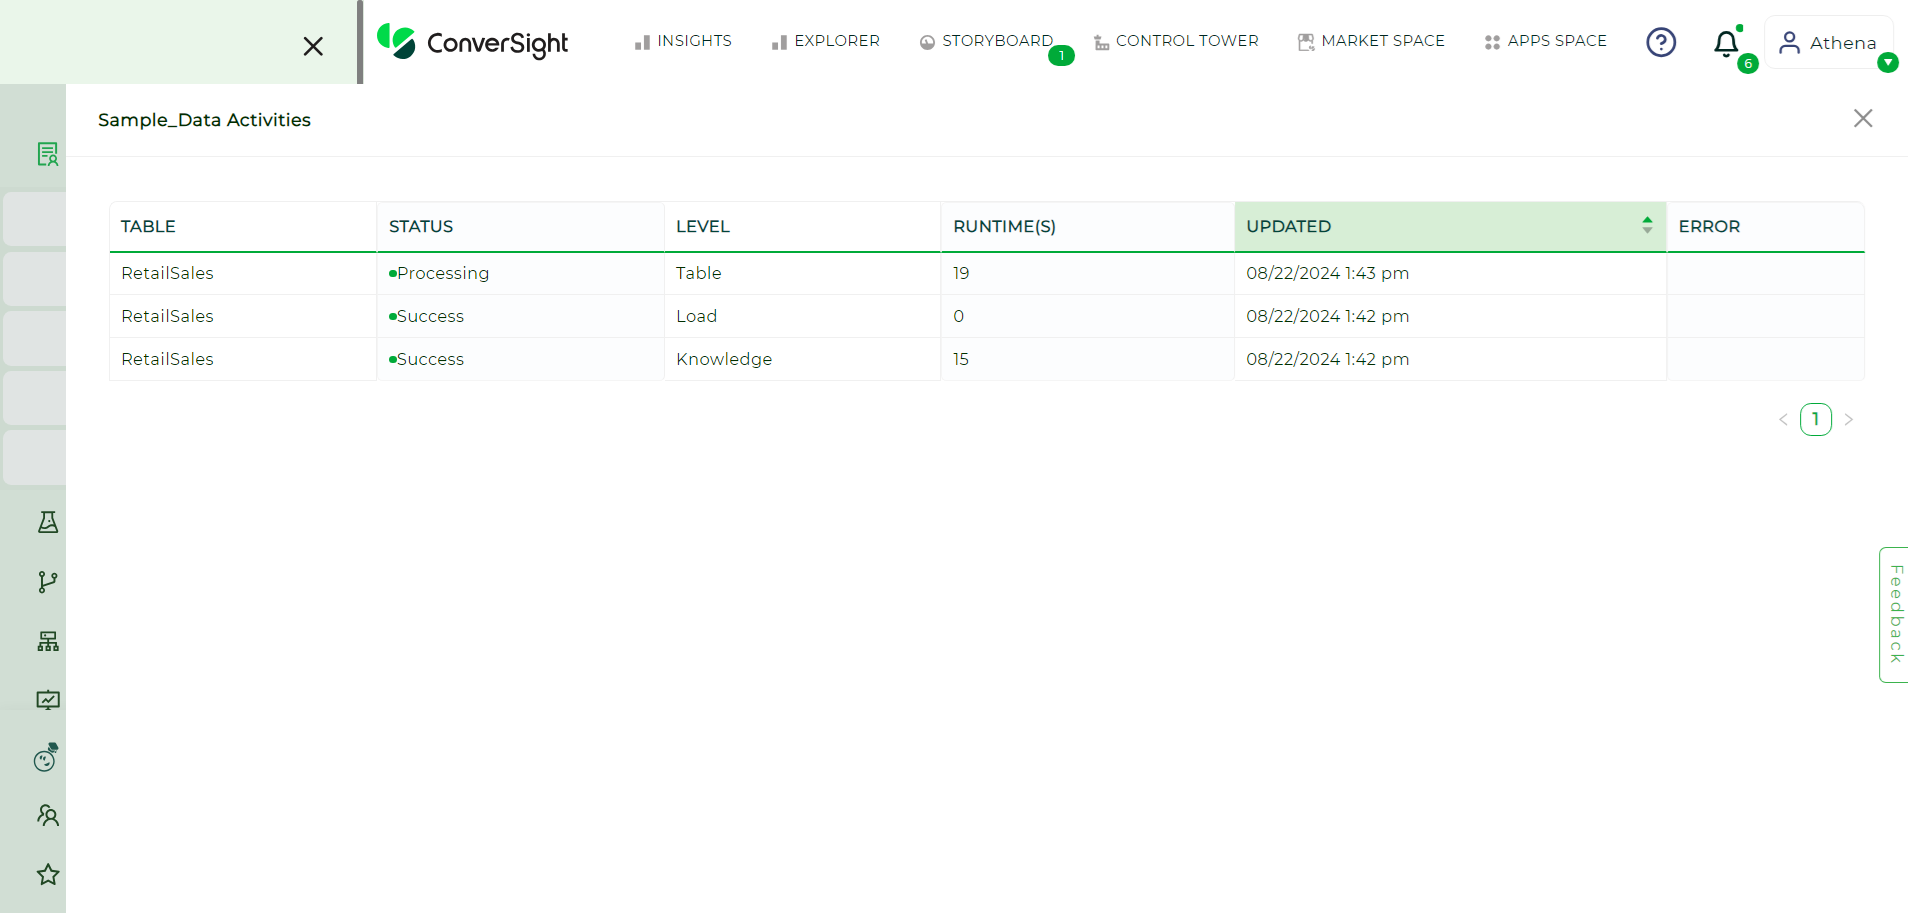
Activity Status#
Schedule#
Scheduling a data load ensures that your datasets are updated automatically at specified intervals, allowing for seamless and timely data management. This process helps maintain the accuracy and relevance of your data, enabling better analysis and decision-making. Follow these steps to create and manage your data load schedules efficiently:
Choose the dataset for which you want to schedule the data load.
Schedule#
Click on the Settings icon in the Action column and select Schedule.
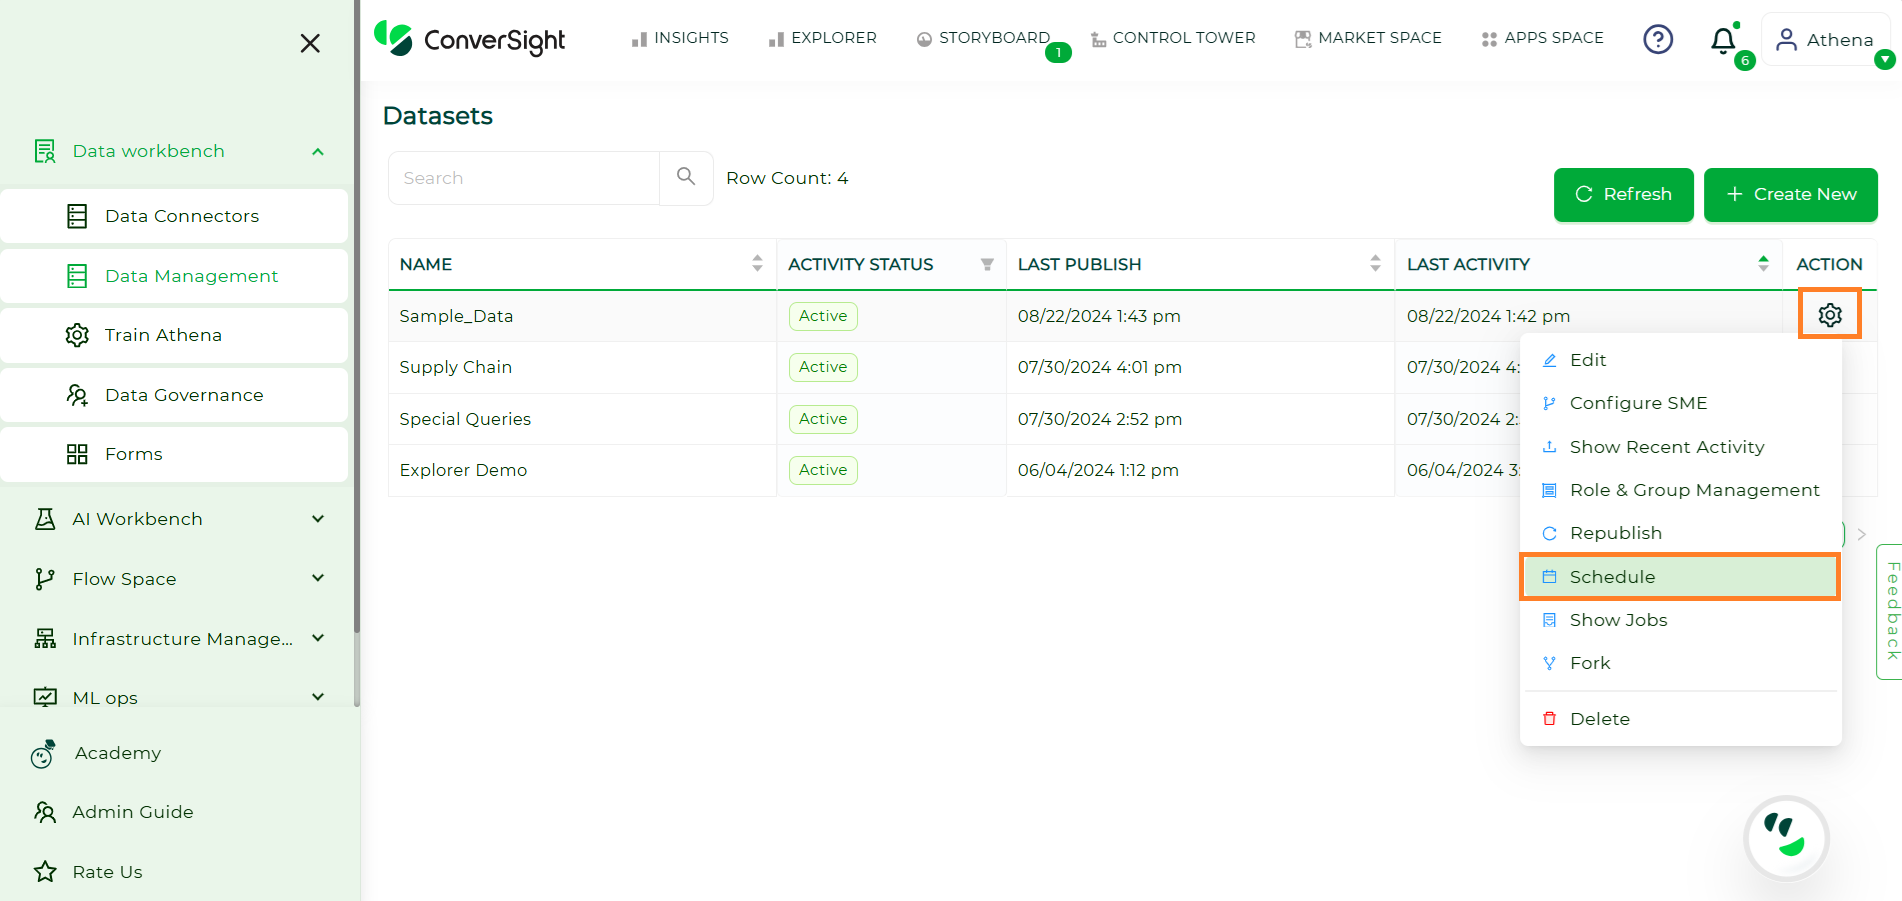
Settings#
Click on the Create button.
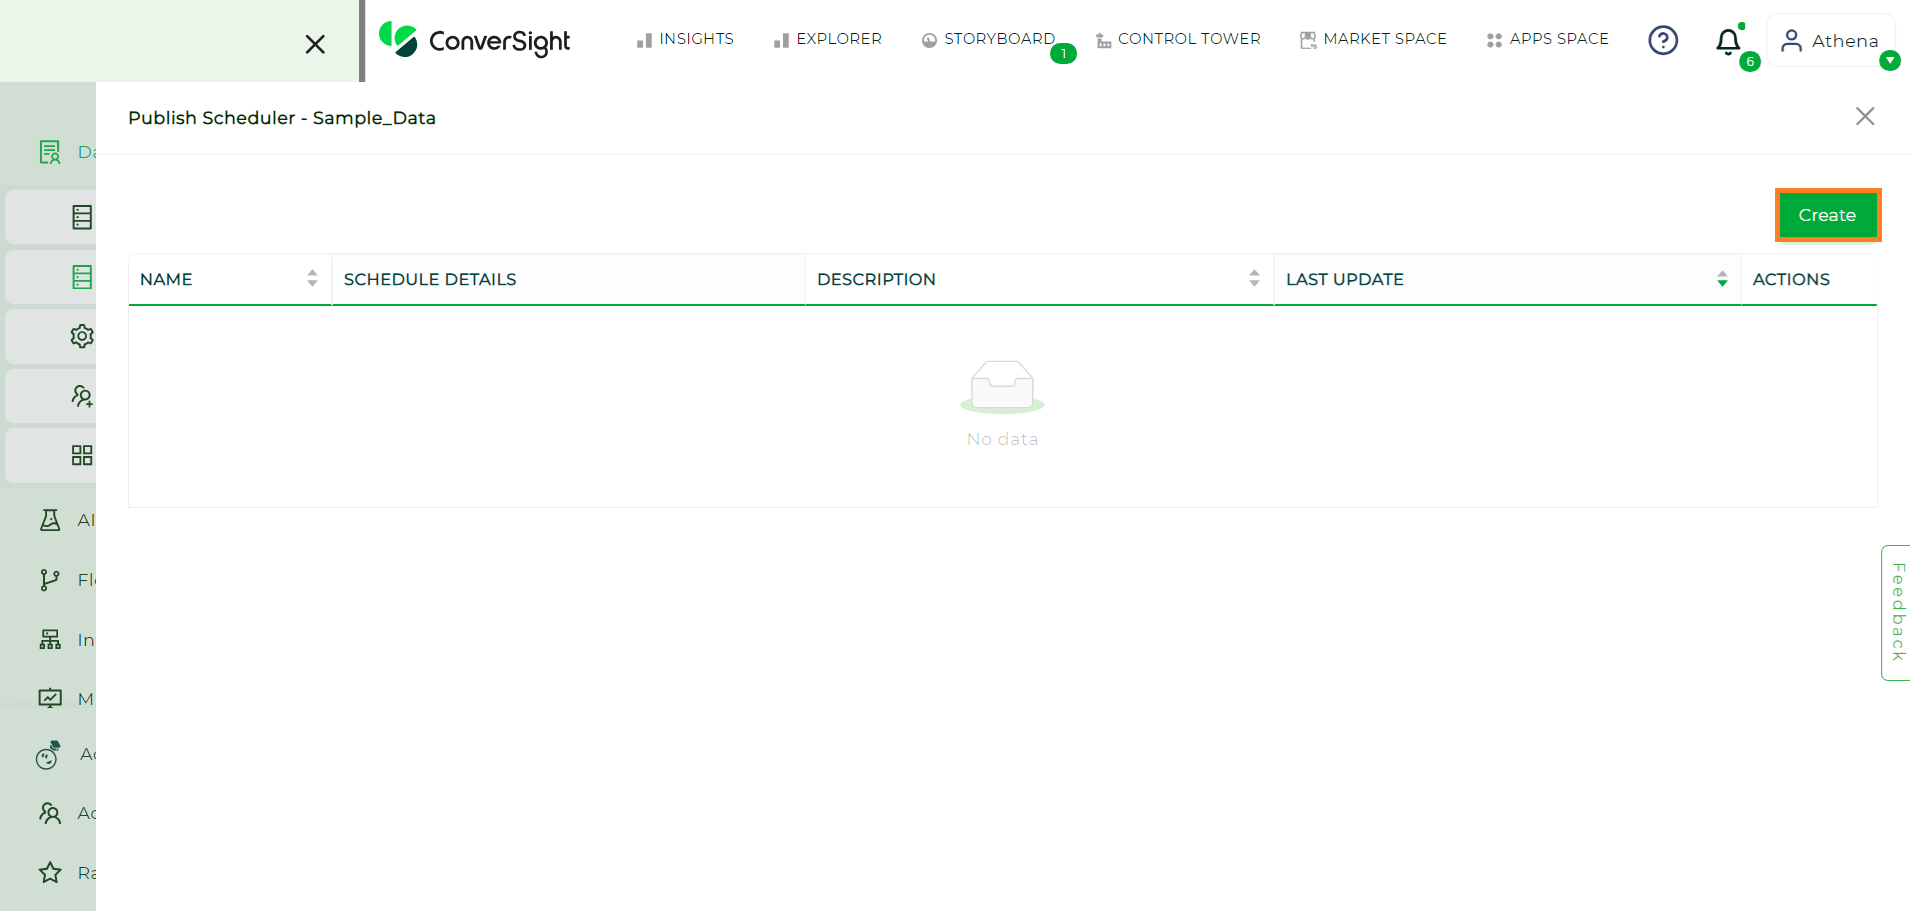
Create Button#
Enter the name of the schedule and optionally provide a description. Set the timing for the schedule—hourly, daily, weekly or monthly.
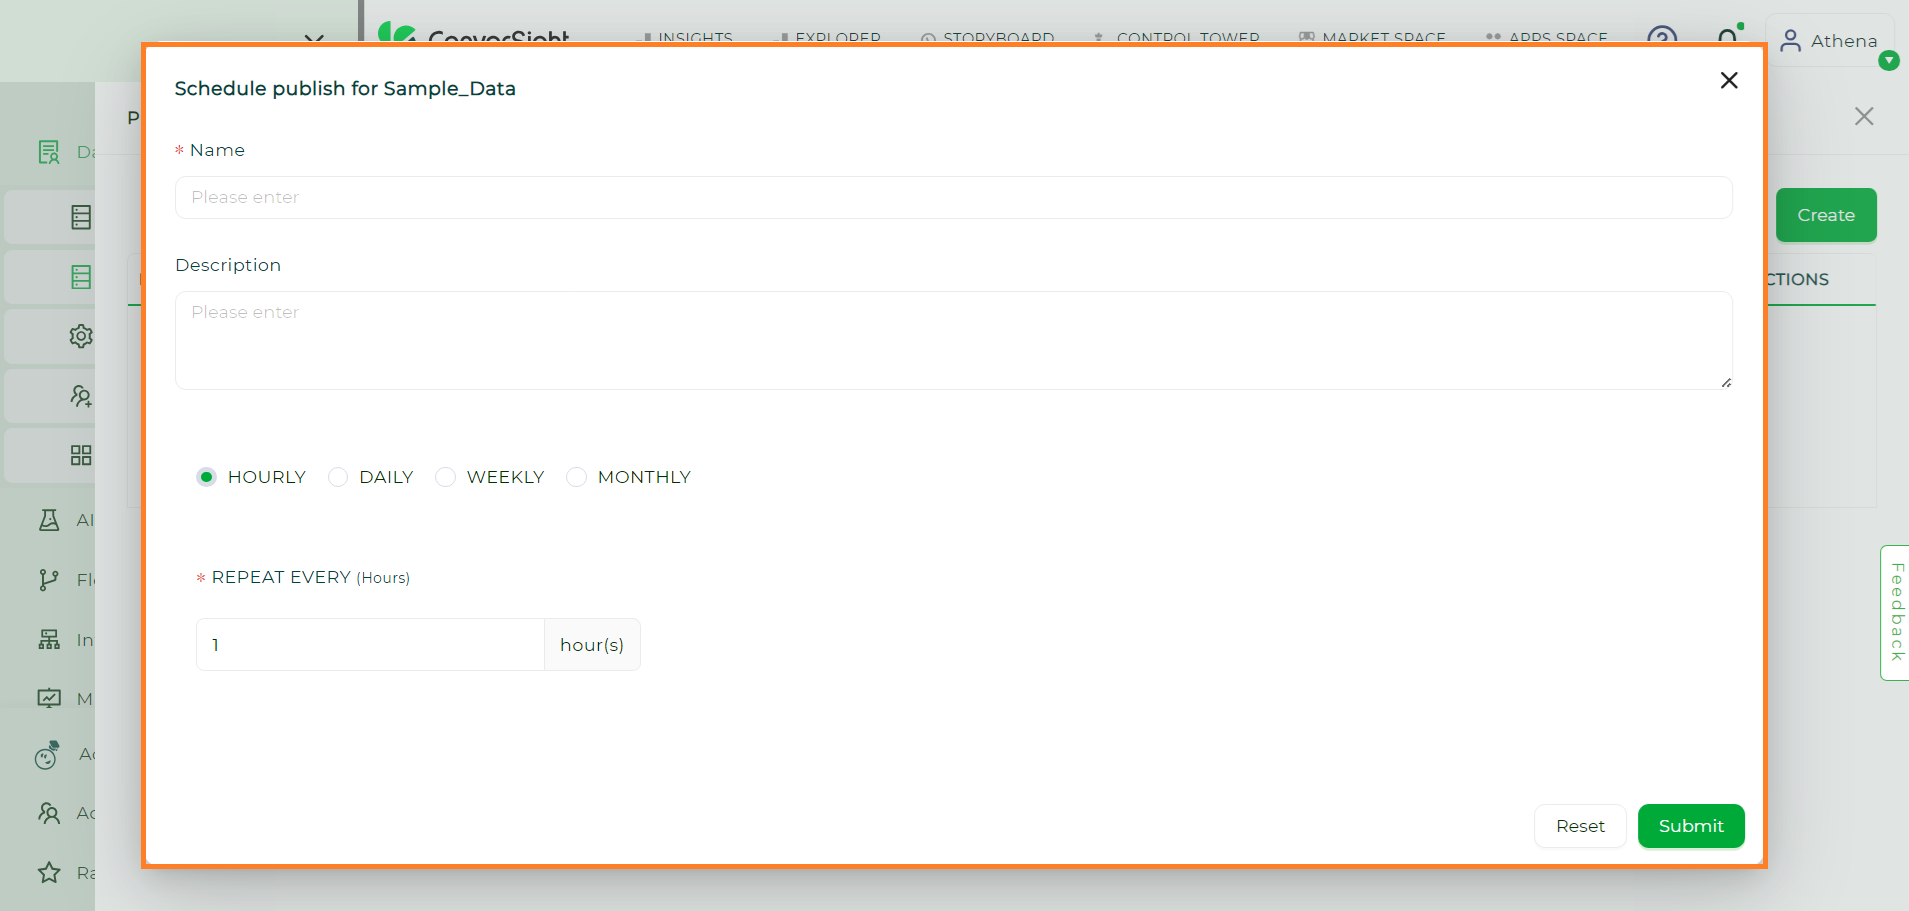
New Schedule#
After configuring the schedule, click the Submit button to successfully schedule your data load.
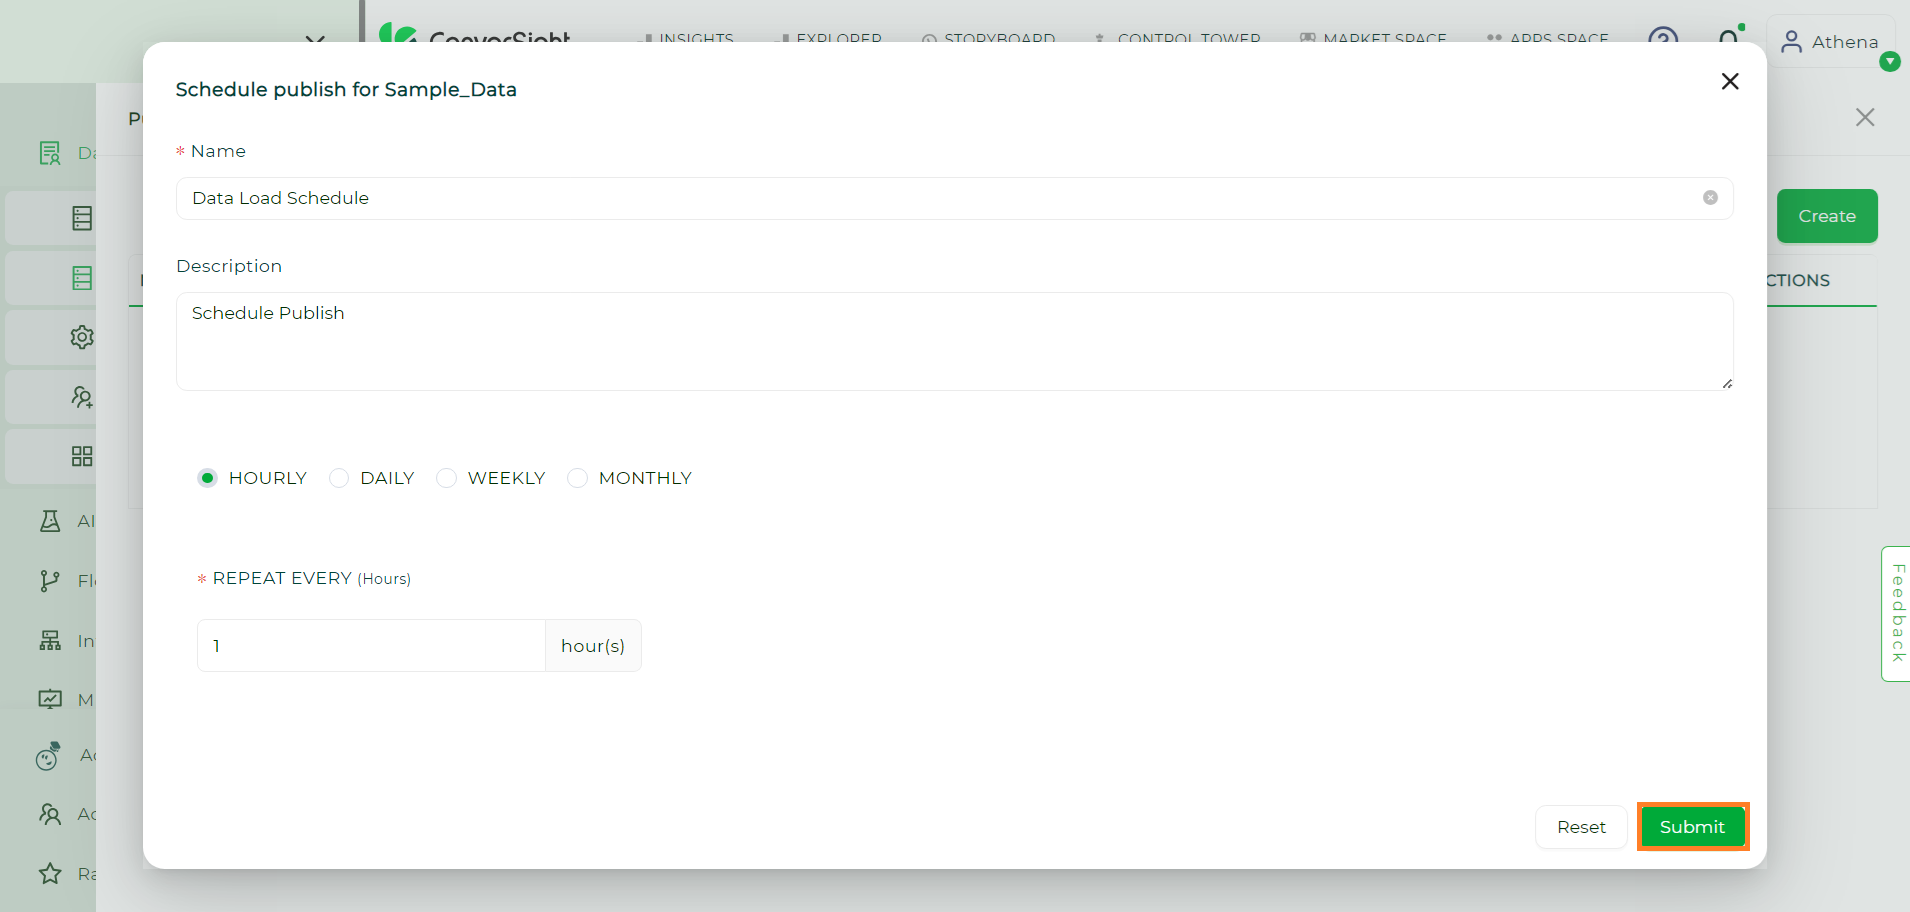
Submit Button#
You can also edit or delete the schedule by clicking the Edit or Delete icon in the Action column.
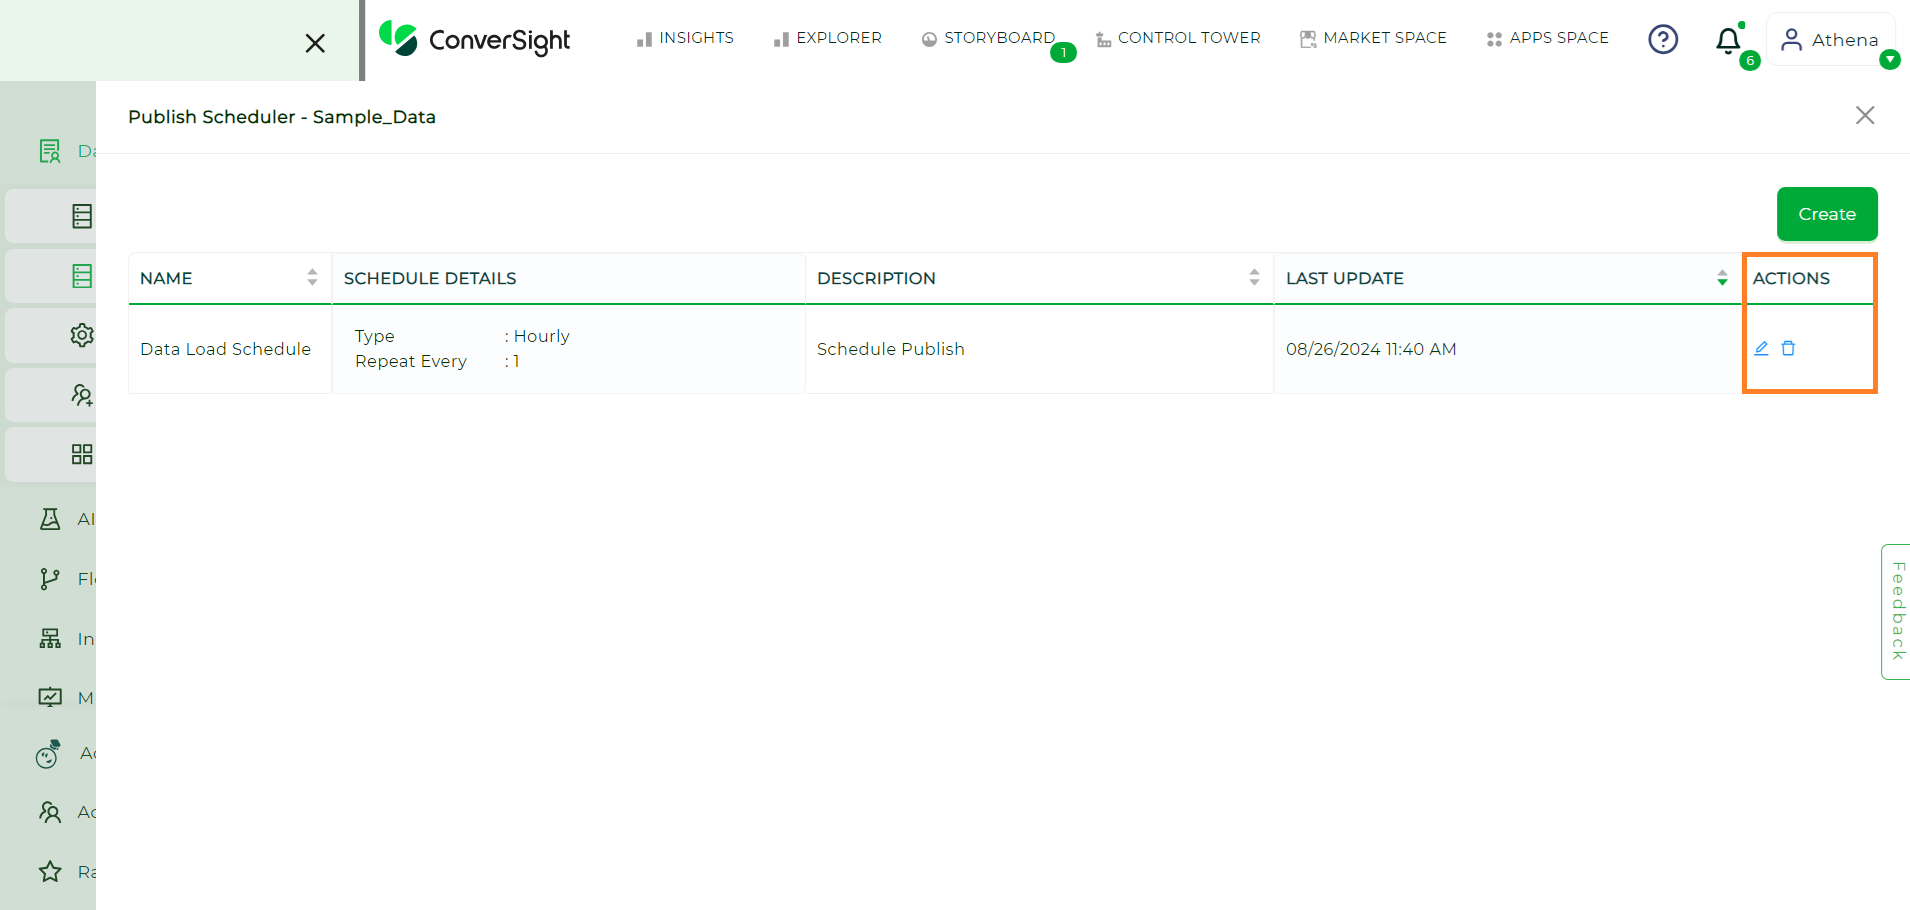
Actions#
Show Jobs#
The Show Jobs section provides a comprehensive view for monitoring the status of various jobs related to your datasets. It displays activities performed on datasets, enabling users to track key actions such as data loading, republishing and SME publishing. Each job is associated with an origin, which indicates the specific trigger point of that activity.

Show Jobs#
Key Features
Field |
Description |
|---|---|
Origin |
Indicates the source or trigger point for each activity, helping users understand how a job was initiated. |
Status |
Displays the current status of the job, such as Processing, Success, Failed and Skipped. |
Task |
Specifies the type of activity being performed. Available tasks include: |
Start Time |
Shows the exact time a job began, useful for tracking and scheduling purposes. |
End Time |
Displays the time a job finished, enabling users to calculate job duration. |
Number of Retries |
Indicates how many times a task has been retried, providing insight into tasks that may require multiple attempts. |
Error
When a job encounters an error, the Error section provides additional details to help users diagnose and resolve the issue effectively.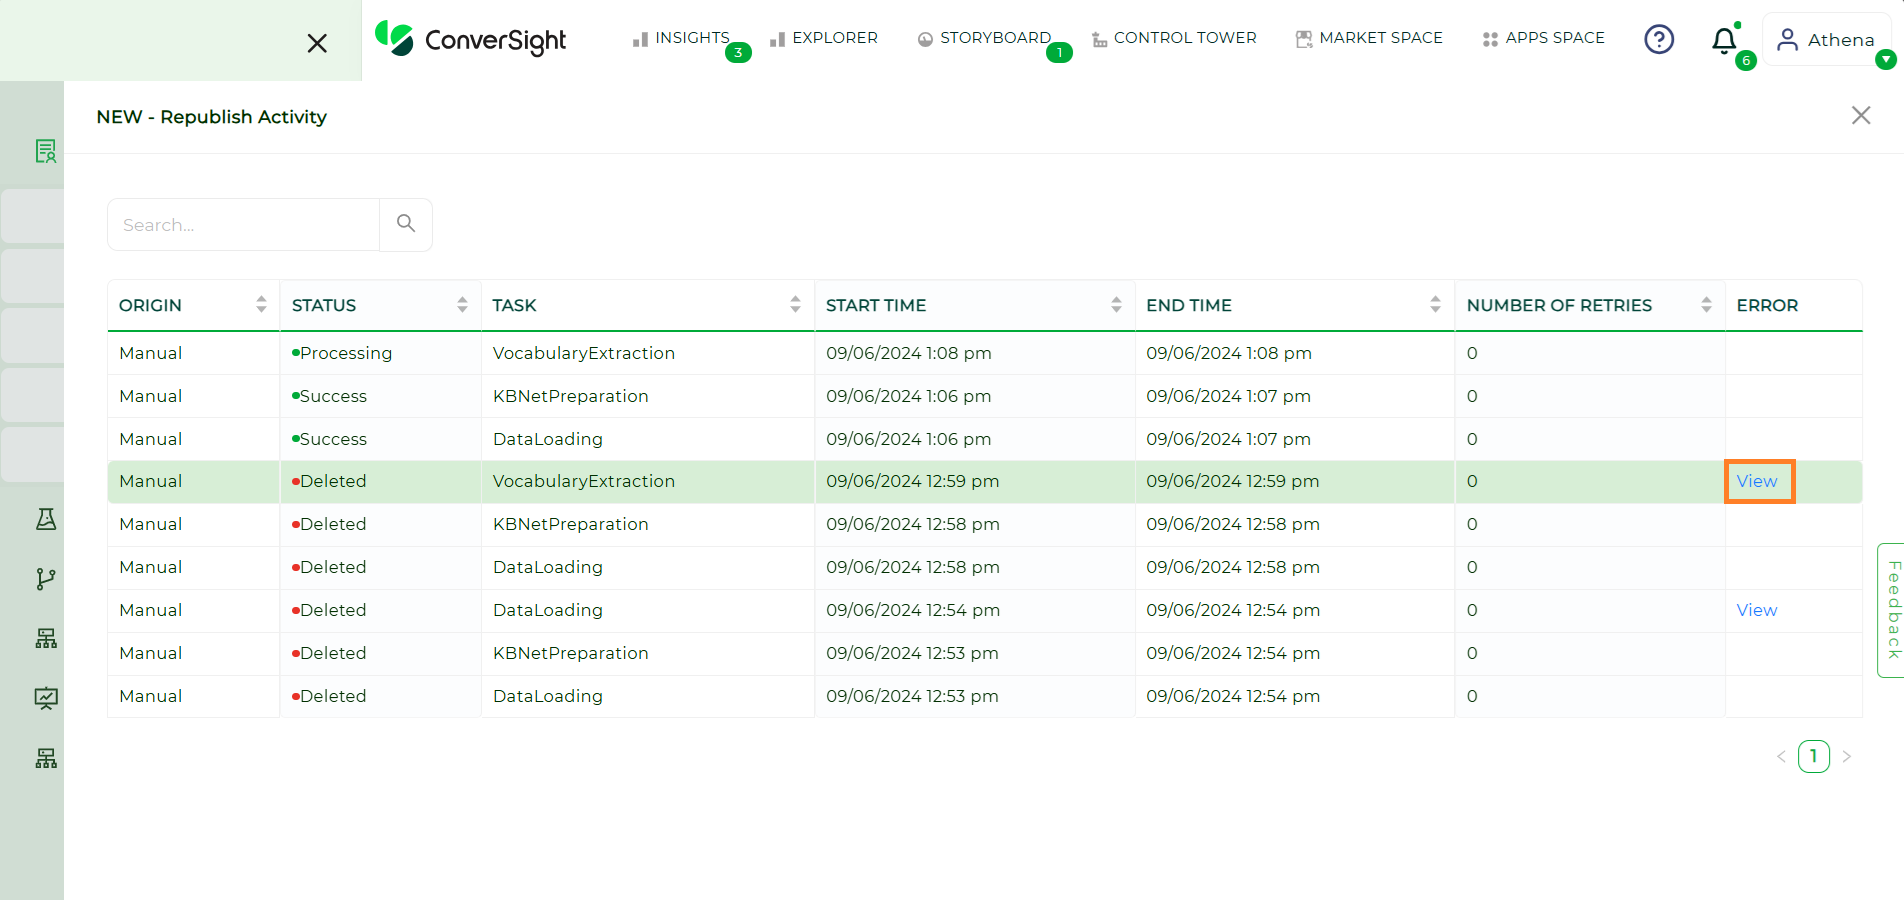
View#
By clicking View, users can access the below listed information:
Field |
Description |
|---|---|
Table |
Identifies the specific table where the error occurred, helping locate the affected dataset or section. |
Status |
Shows the current state of the task associated with the error. |
Count |
Displays the total number of rows in the table associated with the error. |
Error |
Provides a message explaining the nature of the error, assisting in diagnosing and resolving it. |
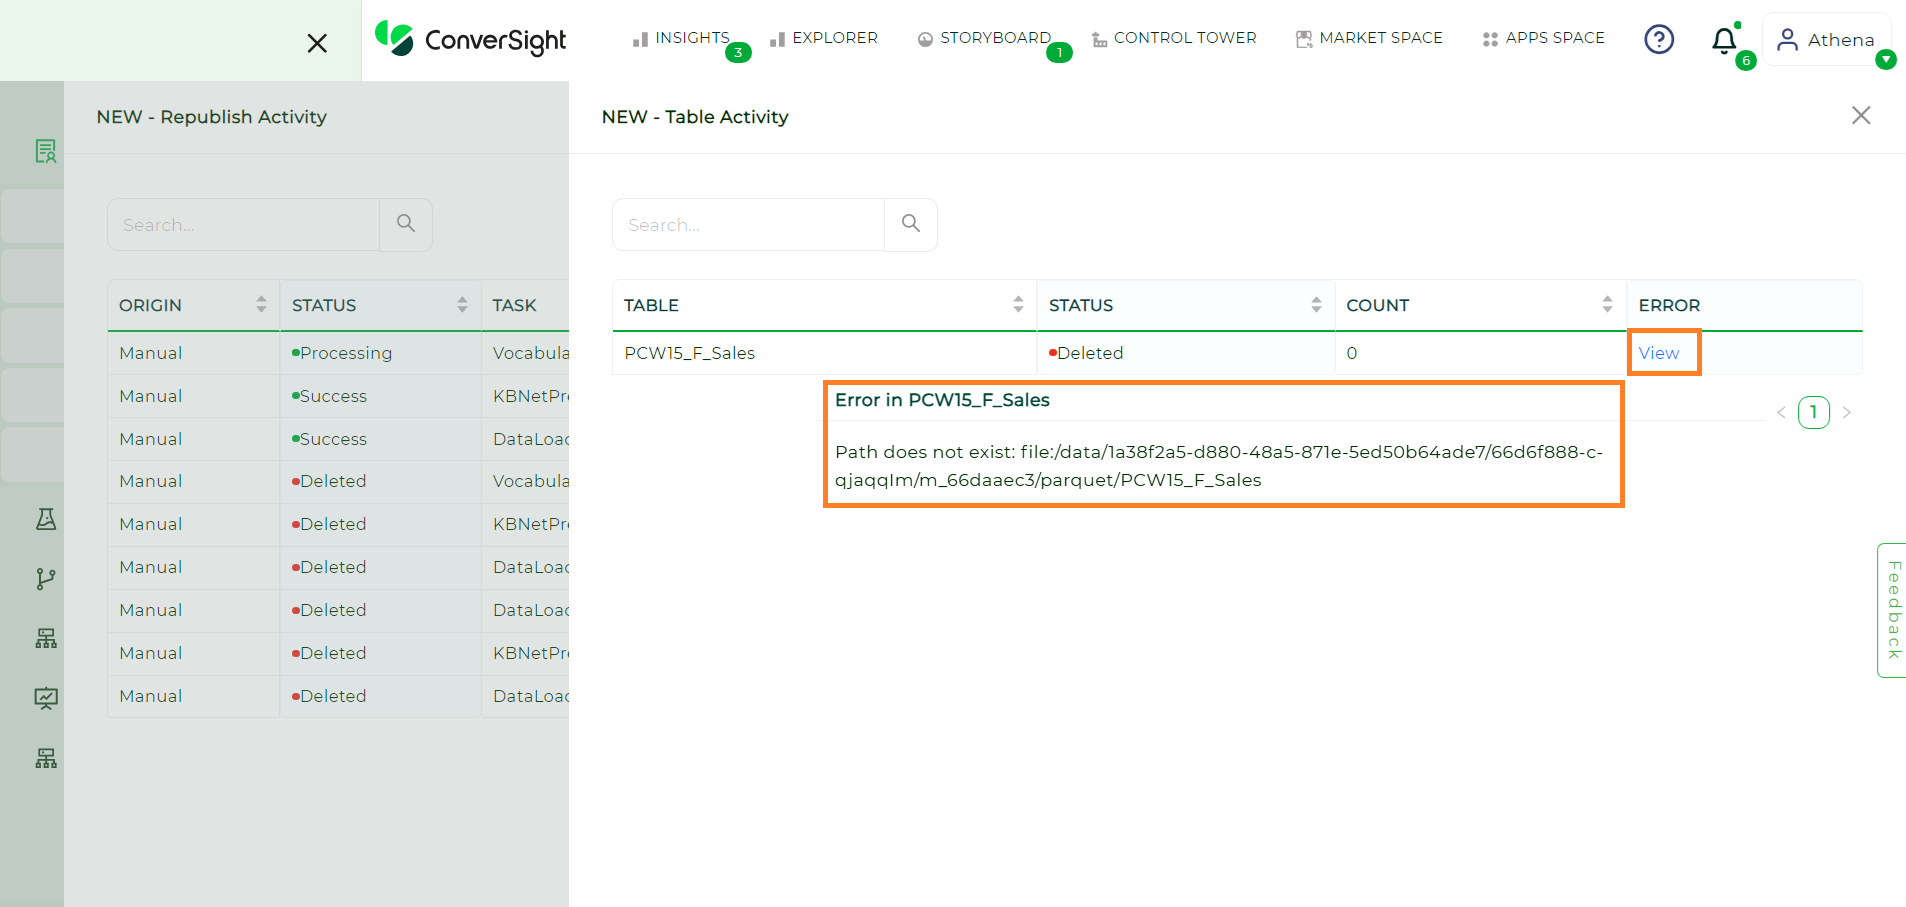
View#
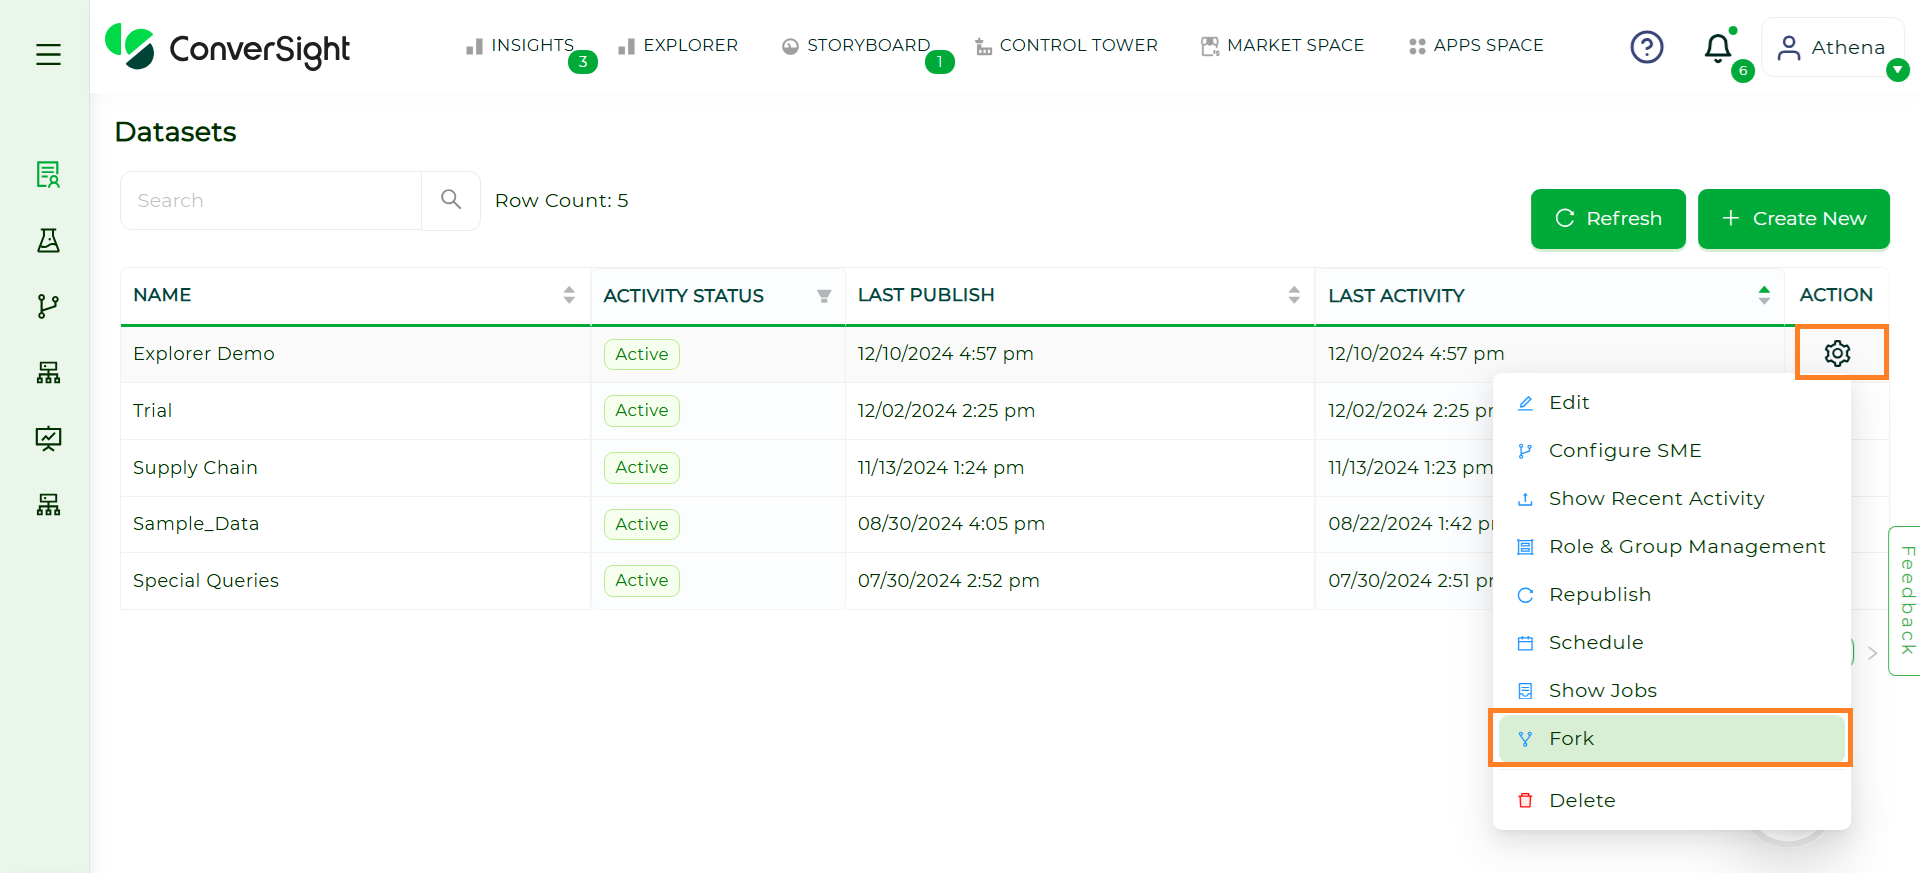
Fork#
Forking a dataset refers to creating a copy of an existing dataset. This allows users to duplicate a dataset while keeping the original intact. The forked dataset can then be modified, analyzed or customized independently of the original, making it a versatile option for creating variations for specific use cases.
Steps to Fork a Dataset in ConverSight:
Step 1: Select the dataset and hover over the dataset’s Settings icon and click on the Fork option.
Fork#
Step 2: After forking, the new dataset’s Activity Status is initially Configured. The following are the status progression of a forked dataset:
Status |
Description |
|---|---|
Configured |
Initial status after the dataset is forked. |
LoadRequested |
The system requests the dataset to be loaded. |
DataLoaded |
The dataset’s data is successfully loaded into the system. |
DictionaryRequested |
A dictionary request is initiated to map the dataset’s semantics. |
DictionaryUpdated |
The dictionary process is completed, updating the dataset’s metadata. |
Active |
Final status indicating that the dataset is fully ready for use. |
Fork Status#